Solve 5 Common Gmail Issues with this Effective Guide!
Most recently in August 2020, Google has reported service disruptions related to Gmail where users find themselves unable to send emails and attach files from their accounts. Though, the same was resolved soon by Google but, this incident put a spotlight on the fact that this hasn’t happened for the first time. Despite being one of the largest and biggest web-based email service providers in the world, Gmail users still frequently noticed reporting against encountering various issues that occur and cause restriction in the proper functioning of its emailing service.
Thus, if you’re wondering about whether you’re the only one who encounters problems with your Gmail account again and again then, breathe a sigh of relief because you’re not alone! From a huge user base of around 1.5 billion users worldwide, there’s hardly anyone who can claim of not encountering Gmail issues.
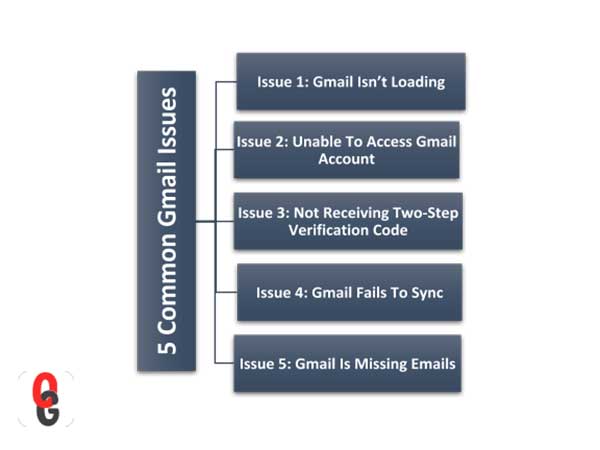
So, considering this given fact in mind, today we’ve decided to dedicate this whole blog to help Gmail users deal effectively with the following below-listed 5 most common Gmail issues that every user has encountered at least once!
Solutions for Troubleshooting Gmail Issue 1!
There are times when you experience issues of ‘not being able to load’ with your Gmail account. Though, it looks like a simple outage issue of the Gmail service but sometimes it’s beyond that! So, it’s important for you to know about all the possible factors that led to the encountered issue, and they’re as follows—
- Your web browser may be incompatible with Gmail.
- Any added browser extension or plugin might be interfering or blocking the Gmail operation.
- Web browser from where the Gmail is usually accessed by you, is not optimized.
- You’ve not properly added or configured your Gmail account on your device.
- And, lastly due to the most common Gmail server outage factor, Gmail might not load correctly!
Now, after knowing the list of factors, you need to ensure that Gmail loads properly and for that apply the following solutions of each of the aforementioned factors accordingly—
- To eliminate the browser incompatibility factor, make sure to use only the Google-supported web browser like ‘Chrome, Safari and Firefox.’ However, in rare cases if you have problems even with the compatible browsers then try enabling cookies and JavaScript as the solution for the same.
- To stop the added browser extension or plugin from interfering or blocking the Gmail operation, disable or remove the same via ‘Browser’s Menu > More Tools > Extensions > (uncheck) Enabled (checkbox).’ And not only the browser extension or plugin, sometimes the other security programs like antivirus and firewall also act in the same manner. So, in addition to the browser extensions, try turning off their security as well.
- To optimize your web browser, clean out its cache, cookies and temporary files because they’re also one of the culprits that can stop Gmail from loading properly. Thus, optimize your web browser simply via ‘Browser’s Settings> Security and Privacy > Clear Browsing Data.’ Along with that, if required, you can also reset the same via ‘Browser’s Settings > Advanced > Reset and Clean up.’
- To make sure that your configured Gmail account loads properly on your device, try removing your account via ‘Settings > Accounts > Google (select your Gmail account) > Three-dot Symbol > Remove account.’ And, once you’re done removing your account from your device, set it back again on the same without worrying about your account’s data because it’s the beauty of a Google-based account that all your data (be it emails, files, documents, movies, photos, and videos) are secured in its servers. So, as soon as you reset your Gmail account on your device, the data that it contains, instantly appear back.
- To simply deal with ‘Gmail can’t connect to server’ or ‘Gmail outage’ issue, you need to first ensure yourself about the same. So, if anytime, you notice an outage or suspected outage of your Gmail service then, visit the ‘Google’s app status Dashboard’ site whose job is to enlighten the Gmail users about the outage issue (through an orange dot indicator). Thus, whenever it happens, contact the local administrator for assistance.
Solution for Troubleshooting Gmail Issue 2!
In case, you suspect that some unfamiliar activity continuously happening within your Gmail account or you’re having trouble logging in to your Gmail account even after various attempts then, most probably the reason behind the occurrence of this particular Gmail issue is that someone might have hacked your Gmail account or you’ve forgotten the correct login password of the same.
Anyway, no matter what the case is! For dealing with can’t access my Gmail account issue, you’re recommended to right away secure your Gmail account with a new and strong password that you can create using the alternative contact methods such as ‘Recovery Email and Recovery Phone Number’ which you have had attached to your Google account during the time of sign-up. [Note: To know in detail about the process of how to reset Gmail password, consider visiting our other blog which is dedicated completely to Gmail sign-in issues.]
However, not necessary during the time of sign-up, users can anytime update their alternative contact details to be added as ‘Password Recovery Methods’ using these following steps (in case they’re logged in)—
- From the inbox page of your Gmail account, click on your ‘Profile Picture’ which is there in the upper-right corner of the page.
- Then, select the option of ‘Manage your Google Account’ from the available menu list.
- After doing so, move further to tap on the ‘Security Tab.’
- Inside it, locate the option of ‘Ways we can verify it’s you’ and once you’re able to find it, click on the same.
- Now, what next you have to do is click on both the ‘Recovery Email and Recovery Phone Number’ options to fill out them with correct information.
Coming back to the point, remember that, these are the widely-used recovery methods that you can consider using anytime to simply gain access to your Gmail account back.
Solution for Troubleshooting Gmail Issue 3!
Straight away, one can say that ‘Two-step verification’ is one of the best methods that anyone can use to secure their Gmail account as it adds another layer to the security of a user’s Gmail account simply by requiring the need of doing a second acknowledgment of a login attempt.
To be more precise, whenever you log in to your Gmail account, you’ll receive a text message with a verification code on your registered mobile number and the same must be entered along with the login credentials details to gain access to your Gmail account. But, unfortunately, that’s not always the case because, sometimes, the Gmail account authentication code doesn’t show up! So, in case, if you’re not receiving the two-step verification code on your device, opt to receive a call on your backup phone (especially on your landline to avoid bad signal strength issues of cell phones).
However, if that don’t work, consider using the ‘Google Authenticator App’ for verification instead of SMS codes and for that, you’ve to first execute these steps—
- Either from the Google Play Store or App Store, download the app and once the download finishes, install the same on your phone.
- Then, you’ll be asked to choose the method for account verification and out of all, simply select the ‘QR Code’ scan method.
- Simultaneously, open the ‘Two-step authentication page’ on your computer and there, locate the ‘Authenticator App’ by scrolling down.
- Once you’re able to locate it, click on the same to follow the on-screen prompts simply for scanning the QR code.
- After that, you’ll receive a code in the app that you need to enter into the ‘Verify’ box on your computer.
- Doing so will link the phone to your account and now, you’re all set to use the ‘Authenticator App’ for logging in to your Gmail account
Other than this, you can deal with ‘cannot receive authentication codes’ or any similar situations, simply by using ‘Backup Codes.’ They’re the set of (10) codes that you can use instead of your two-step verification code to get access to your Gmail account.
[Note: Backup Codes are one-time use codes, and they become inactive as soon as you use them.]
And, to use the set of backup codes to sign-in to your Gmail account without any further trouble, you have to generate them via these steps—
- Visit the ‘Two-Step Verification’ page.
- On the page, click on the ‘Backup Codes Area.’
- Then, click on ‘Get New Codes.’
- After that, click on the generated text file called ‘Backup-codes-<yourGmailaccountusername>.txt’ to download it.
- In continuation, navigate yourself to the ‘Gmail Sign-in’ page.
- There, input your Gmail account’s username and password in the required fields.
- Now, to simply get access to your Gmail account, you’ll be asked for the two-step authentication and for that, click on ‘More Options’ to enter any one of your ‘e8-digit backup code’ from the set of 10 backup codes list( you’ve recently downloaded).
Solutions for Troubleshooting Gmail Issue 4!
There can be a number of different reasons for which the ‘Failure to sync Gmail’ message appears. However, not always receive this kind of message! Sometimes, you’ve to understand the ‘Gmail Account not synced’ issue through various cases like—
- You’re not capable to send emails from your synced Gmail app.
- You’re not receiving emails on your Gmail account.
- Your Gmail account may not have all your emails.
- Or, your Gmail app maybe just too slow.
However, regardless of these cases, you can try several solutions that we’ve mentioned below to let your Gmail account sync properly—
- RESTART YOUR DEVICE: Though look cliché but as noticed, this solution works a surprising number of times. So, try turning your device off and on again because you never know, when the connection between your device and the Gmail server disconnects and doing so might re-establish the same.
- VERIFY YOUR DEVICE’S INTERNET CONNECTION: Again, asking so might look stupid but, it is necessary that you ensure yourself whether your device is connected to a strong internet connection or not. Consequently, whether you’ve mistakenly turned the Airplane mode on or not. It is so because good signal strength is an important factor that plays a crucial role in smoothly running the syncing process of your Gmail app.
- CHECK YOUR GMAIL ACCOUNT SETTINGS: Sometimes, accidentally it is possible that you’ve tapped on the option of ‘Sync’ and turned it ‘Off.’ Therefore, always keep a check on your Gmail app settings and if you notice that sync option has been turned off then, instantly turn it on. And, to do so, open the Gmail app on your device, tap on the ‘Menu’ button of the same from the upper-left corner, then tap on ‘Settings’ to choose your Gmail account and finally, turn on ‘Sync’ from ‘Sync Gmail’ option.
- CLEAR GMAIL APPLICATION DATA: To ensure that your Gmail app and its syncing process will work efficiently and properly, you need to clear its cache at regular intervals. So, in case if you haven’t done it yet, do it now via these steps: ‘Open Settings > Apps & Notifications > App Info > Gmail > Storage > Clear Data > OK > Restart Device.’ Most probably, this trick will help you get rid of the Gmail sync issue that creates trouble in getting mail from Google.
- UPDATE THE GMAIL APPLICATION: If none of the above-mentioned sub-solutions works effectively in resolving the sync issue of your Gmail account then, do not get disappointed and instead of that, try updating your Gmail app to have its latest and greatest version. It is so because Gmail can fail to sync with your Android or iOS App, if you’re using an older, outdated or obsolete version of the same. So, having the most updated version of the Gmail app will definitely help your Gmail account to get properly synced with it.
Solution for Troubleshooting Gmail Issue 5!
If your Gmail account’s inbox is not updating with the emails that are so sure there in the past, then it may be probably because you’ve accidentally deleted them or archived them. And, luckily to ensure about the same you’ve options like checking your ‘Trash Folder.’ So, in order to check the missing emails in the trash folder of your Gmail account, execute these steps—
- First, access your Gmail account by signing-in to the same.
- Then, locate the ‘Folders’ area and from there, click on the ‘More’ option.
- After that, click on ‘Trash’ to open your account’s ‘Trash Folder.’
Now, check whether your missing emails are there or not! If not there, then possibly you’ll find them in the archived folder and to check there, further execute these steps—
- Go back to your account’s inbox page.
- Then, navigate to the ‘Folders’ area again, for clicking on ‘More.’
- After doing so, look for the ‘All Mail’ option and when you click on the same, it will show you all your account’s emails, even those you’ve archived. [Exception: All Mail folder won’t show the emails of the Trash Folder.]
Moreover, if you recollect any detail regarding your missing emails, you can search for them by typing in the search box. And, if you find your missing emails in either place, you can restore them to the ‘Inbox’ folder simply by clicking on the ‘Folder’ icon from the top of the page and then, choosing ‘Move to Inbox’ option. Doing so, will help you see the missing emails of your Gmail account on the inbox page.
That’s all! For the smooth functioning of your Gmail account, we assume that the above-discussed solutions for the ‘5 Common Gmail Issues’ will definitely help you in troubleshooting the same instantly whenever you encounter them.

Strategies of Implementing DevOps for Success

The Top 5 Email Extractor Apps of 2024

How Can QR Codes Simplify Your Daily Routine:…
All-Inclusive Guide on RTasks Login at RTasks.Net!
SPYX Review: The Ultimate Spy Tool for Worried…

From Exams to Exercise: How Health and Wellness…

Spotify Receiptify: Learn How to Create & Share…
Unlocking the Power of Money Transfer: Simplifying the…

Secure and Swift: Exploring Online Money Transfer Options

What Is Spotify Color Palette, How to Create…

Maximizing ROI: Tips for Cost-Effective Direct Mail Campaigns