Use This Guide to Set up Your Gmail Account in MS Outlook Email Client!
With advancement in technology, businesses have started moving towards cloud computing solutions but, despite this fact; it has been noticed that many companies from all across the globe still heavily rely on Google-based applications like ‘Gmail’ for managing their emails, appointments, and meetings. In fact, the majority of them use only Gmail as the main account for meeting both their personal and professional communication needs.
The reasons for this popularity are many like its emailing service comes with GBs of data storage for messaging and storing data at no cost, it is capable enough to automatically detect spam emails and most importantly, it can also be configured in desktop-email clients for convenience. So, there’s no wonder why almost everyone including those who’re reading this blog, holds an account on Gmail platform!
However, knowing that Gmail like other emails can be configured in email clients, if you’re wondering to set up Gmail in Outlook (as it’s the most reliable email client that provides high data security by preventing the same from unauthorized access) and need guidance on the same then, why to waste any time! Take help from the below-mentioned tutorial on “how to setup Gmail account in MS Outlook email client” to configure and use the same comfortably on your desktop.
[Note: This tutorial on how to set up Gmail in MS Outlook email client applies to its various versions like Outlook 2019, Outlook 2018, Outlook 2013, Outlook 2010, and Outlook for Microsoft 365 also.]
The configuration process of setting up Gmail in Outlook is very simple but at the same time, it is quite lengthy also. Therefore, to not skip any step and to simply avoid mistakes, be patient while you start performing the steps for the same. Moreover, before setting up or configuring your Gmail account in MS Outlook, you’ve to fulfill two prerequisites.
Read Also – 5 Common Gmail Issues, How to Fix Them?
Prerequisites of Setting up Gmail in MS Outlook!
1. Enable IMAP/POP Protocol of Your Gmail Account:
Make sure that ‘IMAP/POP’ protocol is enabled in your Gmail account’s settings otherwise you won’t be able to access your Gmail account via Outlook. Thus, if the IMAP/POP protocol seems to be disabled in your case then, enable the same, using these steps—
- First and foremost, open your preferred web browser on your respective device.
- Then, paste this link “https://mail.google.com” in the search bar of the browser and hit the ‘Enter’ button.
- There, input your Gmail account’s login credentials to simply log-in to your Gmail account (that you wish to configure on MS Outlook program).
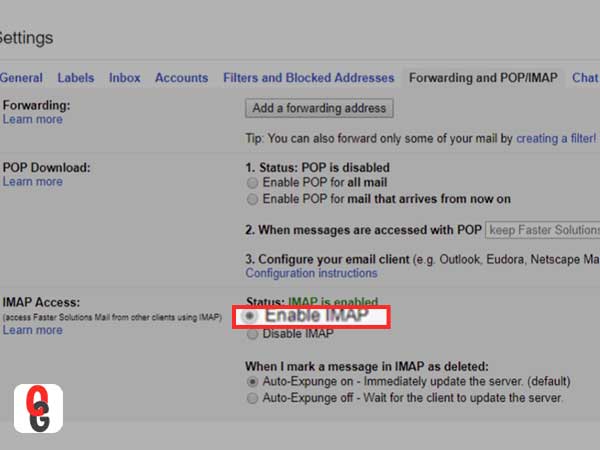
- From your account’s upper right-hand corner, click on the ‘Gear-like Icon’ and simply select the ‘Settings’ option from the drop-down menu list.

- After that, what you need to do is select the ‘Forwarding and IMAP/POP’ tab.
- Inside that tab, locate the section titled as ‘IMAP Access’ and once you’re able to locate it, click on the same to further select ‘Enable IMAP’ option if the same is not already enabled.
- And, in the end, don’t forget to click on the ‘Save Changes’ button to save the changes that you’ve made.
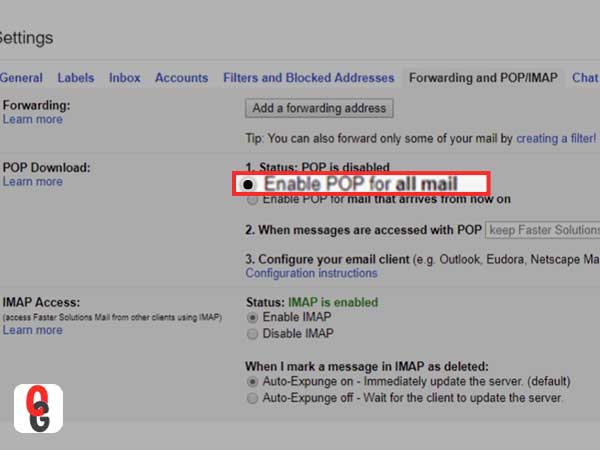
[Note: Similarly, like you have enabled IMAP, you can configure Gmail in Outlook by selecting the ‘Enable POP’ option also.]
2. Turn on Allow Less Secure Apps Option:
This option is mostly turned off by Google because some apps and devices use less secure sign-in technology and can make your Gmail account vulnerable. However, in this special case, you have to turn it on so that you can access your Gmail account easily from Outlook. And, here’s how you can turn it on—
- From your Gmail account, go to ‘My Account’ option and select ‘Security’ option from there.
- Under it, hit the toggle switch of ‘Allow less Secure Apps’ option to turn it on!
- Alternatively, you can visit this link “https://myaccount.google.com/lesssecureapps?pli=1&rapt=AEjHL4NUE5zizC9FuNouH5ZXpb8ZTy3eHTYF_lAShi5ugIDyTFvWvNA9 AFlgH43cY_ej1KcmRMTxSRdQ9UoUsZ1uAgWimL9uJw” to directly turn on the option of ‘Allow less Secure Apps,’ that’s it!

Now, you’re all set to move forward and execute the below-mentioned steps to set-up and configure your Gmail account in MS Outlook email client:
Steps to Execute for Setting up a Gmail Account in Outlook!
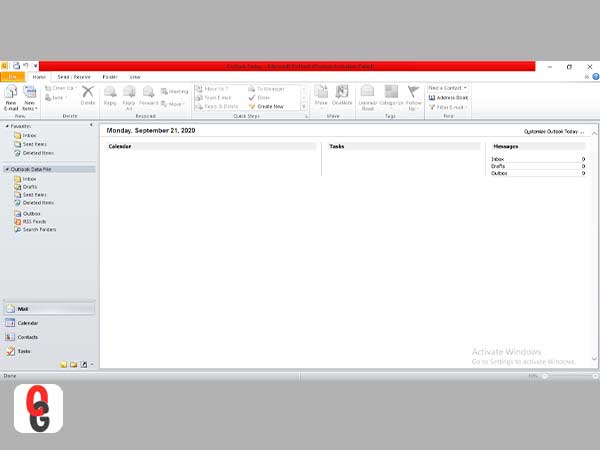
- Step 1: MS Outlook: Launch the MS Outlook program on your computer.
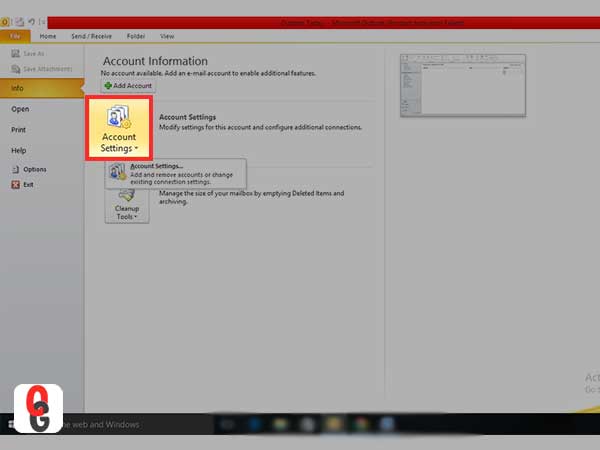
- Step 2: File Group: Once the program launches, navigate yourself to the ‘File Tab’ (which is there in the upper-left corner of the program screen) to click on the same for opening its ‘File Group.’
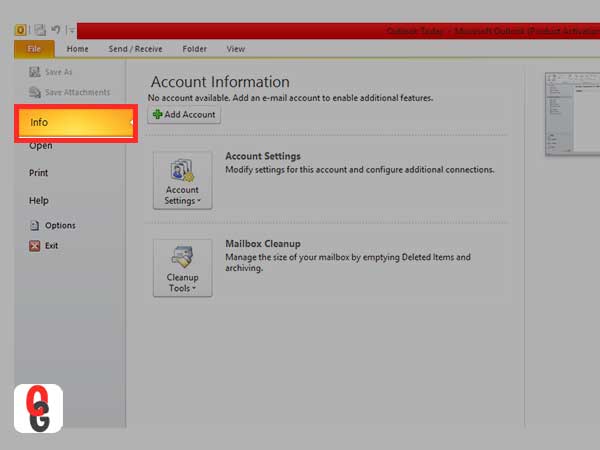
- Step 3: Account Settings: From the file group, open the ‘Info’ category and click on the ‘Account Settings’ option to expand the same for simply selecting another ‘Account Settings’ option.
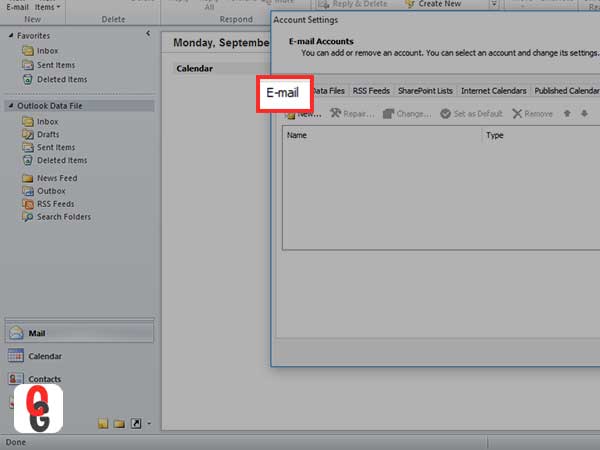
- Step 4: Email Tab: By selecting the account settings option, a small ‘Email Tab’ box will appear in front of you.
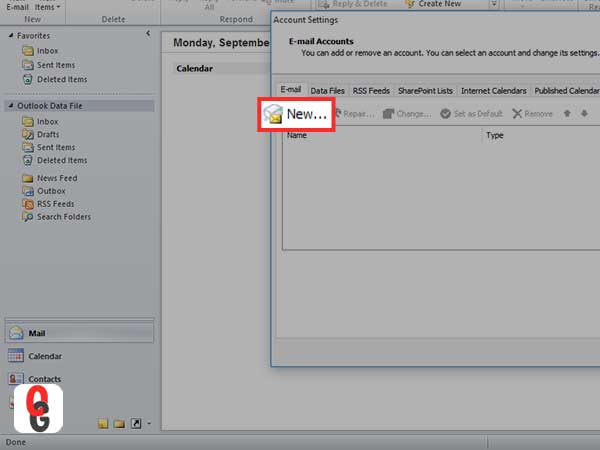
- Step 5: New: Inside the same email tab, you have to just locate the ‘New’ button and once you’re able to locate the new button on the email tab, click on the same.
- Step 6: Add New Account: Clicking on the new button will launch the ‘Add New Email Account’ box in front of you.

- Step 7: Manual Setup or Additional Server Types: As soon as the wizard opens up in front of you, click on the option of checkbox that reads “Manual Setup or Additional Server Types.” In continuation, after tick-marking the checkbox, also click on the ‘Next’ button to move ahead.
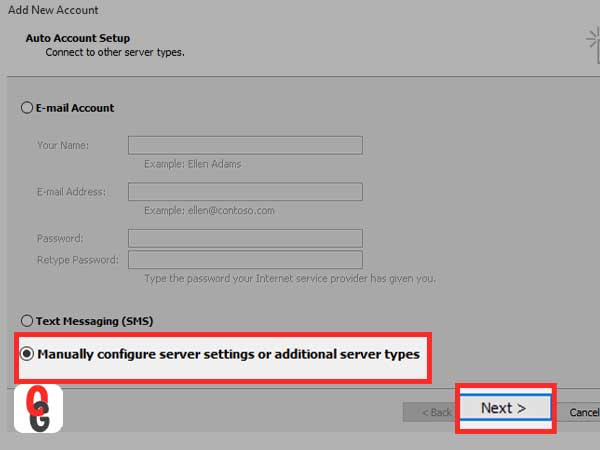
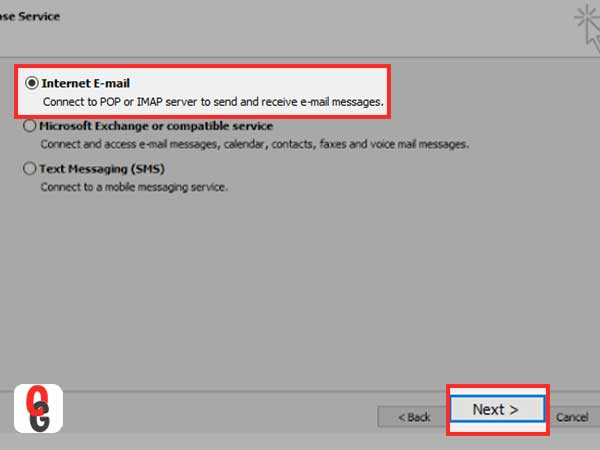
- Step 8: Internet E-mail: Here on the ‘Choose Service Page,’ select ‘Internet Email’ option and again hit the ‘Next’ button.
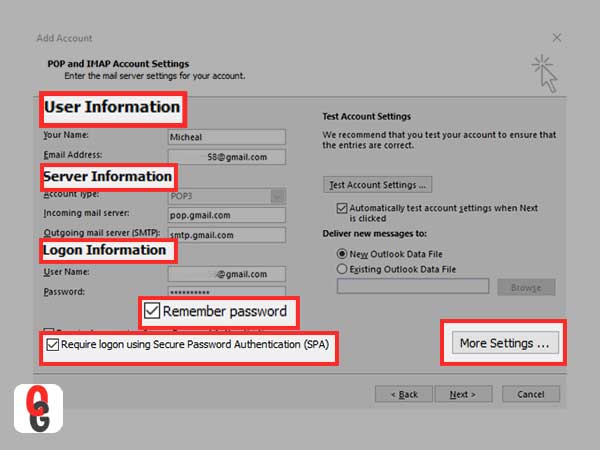
- Step 9: User Information Tab: On the next window, navigate yourself to the ‘User Information Tab’ and inside the same, all you have to do is enter Gmail account’s user data like—
- Your Name (that appears in your outgoing messages)
- Your Email Address (email ID of your Gmail account)
- Step 10: Server Information Tab: Now, as you finish entering the user-data (that is associated with your Gmail account), click on the option of ‘Type of Account’ under the ‘Server Information Tab’ to select either ‘IMAP’ or ‘POP’ from the drop-down list because you can configure your account using only one of them!
Read Also – Gmail IMAP, POP and SMTP Server Settings
[Note: Though, it is completely your choice to choose either ‘IMAP or POP’ as the account type for configuring your Gmail account in Outlook using their respective server settings. But, as recommended by many, we also suggest you to choose ‘IMAP’ instead of ‘POP’ because this is considered as the ideal way of retrieving emails in Outlook from a web-based account. Also, as the copies of your account messages are still there on the Gmail server, you can access them anytime and anywhere from your various devices.]
- Step 11: Gmail Server Information: Now, based on your choice of ‘account type’ selection, input the correct server information of Gmail for Outlook to simply continue the configuration process further.
- Step 12: Incoming Mail Server For IMAP: If you’ve selected ‘IMAP’ for incoming mail server then, use these “Gmail Incoming ‘IMAP’ Server Setting for Outlook”:
- Incoming Mail Server: imap.gmail.com
- Step 13: Incoming Mail Server For POP: On the contrary, if you’ve selected ‘POP’ for incoming mail server then, use these “Gmail Incoming ‘POP’ Server Setting for Outlook”:
- Incoming Mail Server: pop.gmail.com
- Step 14: Outgoing Mail Server: And, no matter whether you’ve selected ‘IMAP’ or ‘POP’ for outgoing mail server, use this “Gmail Outgoing ‘IMAP/POP’ Server Setting for Outlook”:
- Outgoing Mail Server (SMTP): smtp.gmail.com
- Step 15: Logon Information Tab: Next, click on the ‘Logon Information Tab’ to further enter the following information of your Gmail account—
- Username (Enter Your Gmail Account’s Username)
- Email Address (Enter Your ‘Gmail Account’s Email ID’ Containing the Gmail Domain. For instance, username@gmail.com)
- Password (Enter Your Gmail Account’s Log-in Password)
- Step 16: Remember Password: With entering the password, make sure to also tick-mark the ‘Remember Password’ checkbox to simply let Outlook save your Gmail account’s password for making the log-in process easier for you.
- Step 17: SPA: Similarly, you have to also tick-mark the checkbox that reads— ‘Require logon using Secure Password Authentication (SPA).’
- Step 18: More Settings: Moving ahead, click on the ‘More Settings’ option from the lower-right hand corner of the screen.
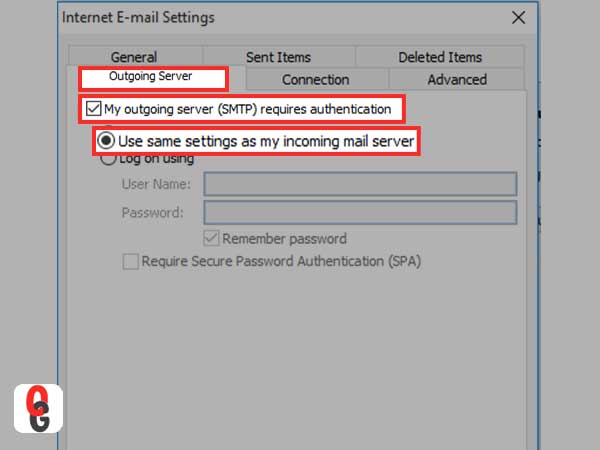
- Step 19: Internet Email Settings: Doing so, will open a new ‘Internet Email Settings’ window in front of you.
- Step 20: Outgoing Server: Inside the same window, select the ‘Outgoing Server’ tab to do the following—
- Checkmark the box that reads ‘My outgoing server (SMTP) requires authentication.’
- Select ‘Use the same settings as my incoming mail server’ from the available options.
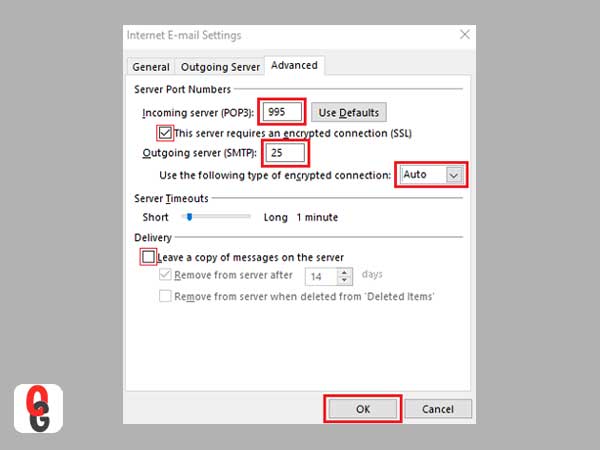
- Step 21: Advanced Tab: Further, select the ‘Advanced’ tab and enter the following given additional settings under the ‘Server Port Numbers’—
If selected IMAP-
- Incoming Server Port: Enter 993 for IMAP accounts
- Outgoing Server Port (SMTP): Enter 587 or 25 for IMAP accounts
- Use the following type of encrypted connection: SSL
- Under Root File Path: Enter [Gmail]
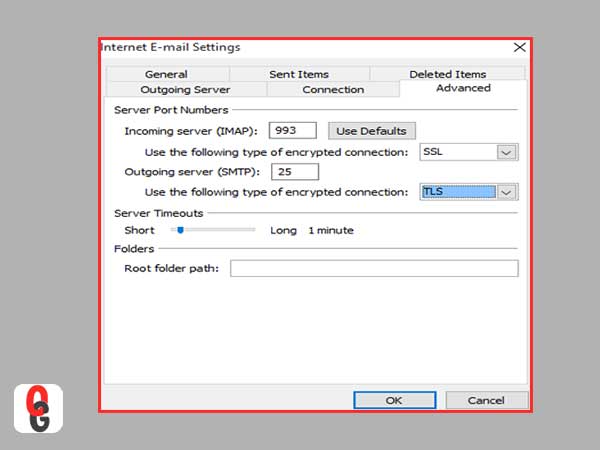
If selected POP-
- Incoming Server Port: Enter 995 for POP accounts
- Outgoing Server Port (SMTP): Enter 587 or 25 for POP accounts
- Use the following type of encrypted connection: TLS
- Under Delivery: Uncheck this [Leave a copy of messages on the server.]
- Step 22: POP and IMAP Account Settings: Now, re-check your configured Gmail server settings for Outlook that you’ve entered for confirming that you’ve entered them correctly. And, once you have confirmed the same, click on the ‘OK’ option to simply return to the previous window titled as ‘Internet Email Settings.
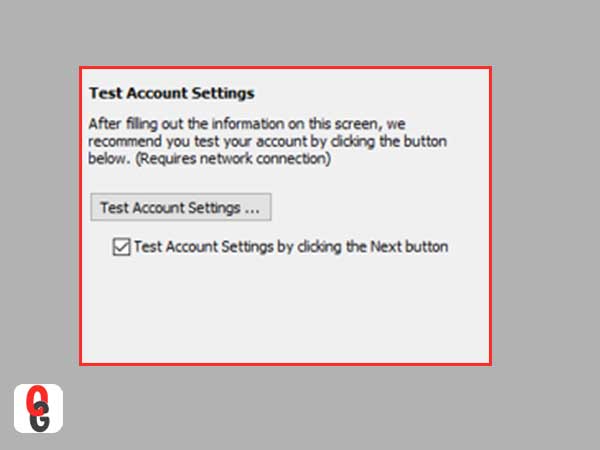
- Step 23: Test Account Settings: Last but not least, click on the ‘Test Account Settings’ option to initiate a test of your e-mail settings. The result of the same will help you in verifying whether you’ve properly configured your Gmail account in Outlook or not!
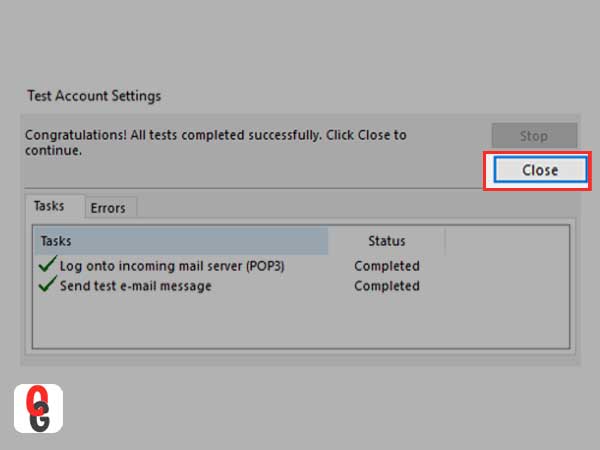
- Step 24: Close: Finally, if everything seems fine and you receive a message saying, ‘Congratulations! All tests completed successfully’ then, as the final step, click on the ‘Close’ button and finish the process of configuring Gmail account in MS Outlook.
That’s all! This is how you can configure Gmail in MS Outlook email clientprogram to have offline access to your Gmail account and that too, potentially within an email environment you’re familiar with. However, this doesn’t mean you cannot use the Gmail web-client, in fact you always have that option ‘ON.’ So, whenever you feel like using Gmail web-client you can log-in to your Gmail account from ‘Gmail Sign-in Page’ and you’re good to go!

Strategies of Implementing DevOps for Success

The Top 5 Email Extractor Apps of 2024

How Can QR Codes Simplify Your Daily Routine:…
All-Inclusive Guide on RTasks Login at RTasks.Net!

SPYX Review: The Ultimate Spy Tool for Worried…

From Exams to Exercise: How Health and Wellness…

Spotify Receiptify: Learn How to Create & Share…

Unlocking the Power of Money Transfer: Simplifying the…

Secure and Swift: Exploring Online Money Transfer Options

What Is Spotify Color Palette, How to Create…

Maximizing ROI: Tips for Cost-Effective Direct Mail Campaigns