Record a Zoom Meeting Without Host Permission [ Detailed Guide]
The coronavirus has forced many people to work from home. Long-distance communication is one of the biggest problems. Zoom provides people with a way to make that work. Many companies and schools use Zoom to give lectures and more. However, online communication is still not so efficient as a face-to-face one.
Recording the Zoom meeting can be an effective solution. The recorded videos can be saved for future review. This article introduces 4 ways to achieve this. You can choose one according to your need.
Part 1. Best Way to Record Zoom Meeting Without Host Permission
Zoom provides the built-in recording feature for both free users and paid ones. However, there are limitations. You need to ask the host to permit you to do that. Is there an alternative recording tool? Luckily, you’ll get to know an excellent recording software in this post. Here we present you AVAide Screen Recorder – the best Zoom recording tool.
AVAide Screen Recorder enables you to capture any activities on your screen, including online lectures, team meetings, mouse moving, and even game videos with high quality. You can also choose to record the system sound and the microphone for your convenience. Recently, the phone recorder features are released and you can cast your phone screen to the computer and save the phone screen video directly on the computer. There are more astonishing small features about this powerful screen recording tool, such as recording history, auto stop, task schedule, and recording with watermark. The output videos are all of high quality. Now read the guide down below and try it yourself.
Step 1. Download and Install
Click AVAide Screen Recorder to visit the product’s official website. Download and install it following the on-screen instructions.
Step 2. Select Video Recorder.
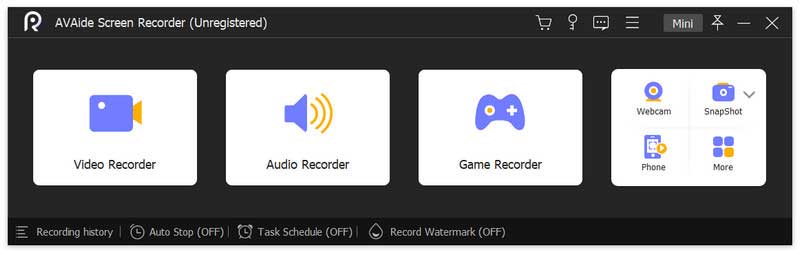
Launch AVAide Screen Recorder on your computer. Then select Video Recorder from the main interface.
Step 3. Customize Recording Settings
On the left, adjust the recorded area by dragging the dotted border or changing the width and length. Choose to turn on/off the Webcam, System Sound, and Microphone according to your need. When all settings are done, click the REC button to start recording.

Step 4. Edit Recording
During the recording, you can choose to add frame, ellipse, arrows, lines as you like. Texts and airbrushes are also available. If you want to end the recording, click the red square button.
Step 5. Preview Recorded Video
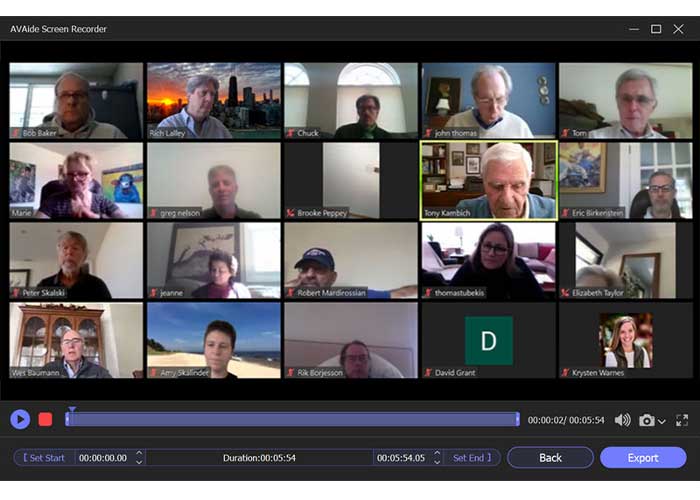
In the preview window, you can trim the video or take snapshots. If you’re satisfied, hit the Export button and view your recorded Zoom meeting.
Part 2. How to Record on Zoom (Desktop, Phone, and Browser Extension)
Record Zoom on Desktop
Step 1. After starting the Zoom meeting. Click the Record button at the bottom of the meeting interface. You’ll see the recording sign in the top-left corner, which means the recording is in process.
Notice: If you’re a paid user, you can choose to start a local or a cloud recording.
Step 2. Click the Pause or Stop button to achieve the corresponding operation. You can find the video in your local folder.
Record Zoom on Phone
Make sure that you have the Zoom app on your phone. For mobile users, we recommend you use the paid version to store the recorded video on the cloud, which saves a lot of space.
Step 1. Open the Zoom app and then tap More >Record.
Step 2. The same as the desktop version, you can see the Recording icon on the screen. What is different is that you can press the icon to pause or stop the recording directly.
Step 3. When the recording is done, you can download it from the cloud when you need it.
Record Zoom Using Browser Extension
If you don’t want the recording software or app, you can choose a browser extension. Although Zoom has its own one, many people think it’s not efficient. Here we present you the alternative tool, Fluvid. Here are the steps.
Step 1. Go to the Google Chrome store and find Fluvid. Click Add to Chrome.
Step 2. You should set permission with an authorized account. Click Next.
Step 3. Start a Zoom meeting and start the recording.
Step 4. You can find the recorded video in My Video from Fluvid.
Conclusion
This article introduces different ways to record a Zoom meeting. Some require payment, some need permission from the host. Your best choice is definitely AVAide Screen Recorder, which enables you to record Zoom meetings without any limitation. After reading the detailed guide, you can download AVAide Screen Recorder and try to record a Zoom meeting or record yourself presenting a PowerPoint.

Strategies of Implementing DevOps for Success

The Top 5 Email Extractor Apps of 2024

How Can QR Codes Simplify Your Daily Routine:…
All-Inclusive Guide on RTasks Login at RTasks.Net!

SPYX Review: The Ultimate Spy Tool for Worried…

From Exams to Exercise: How Health and Wellness…

Spotify Receiptify: Learn How to Create & Share…
Unlocking the Power of Money Transfer: Simplifying the…

Secure and Swift: Exploring Online Money Transfer Options

What Is Spotify Color Palette, How to Create…

Maximizing ROI: Tips for Cost-Effective Direct Mail Campaigns