The All-Inclusive Guide to Gmail Filters
No-brainer managing your email account is way more stressful. There is hardly anyone out there who doesn’t have a cluttered inbox or will definitely have one, someday in life. Well, because an email statistics report “2020 to 2024” from the Radicati group indicates that the total count of consumer and business emails sent and received per day will exceed 306 billion in the coming years.
This report is self-explanatory as to why the majority of people nowadays search on Google or for that matter Quora about the best ways to declutter their email inbox as they are bombarded with hundreds, if not thousands of emails a day.
In fact, as per another study conducted by the University of Loughborough wherein researchers tracked some participants using heart rate monitors and found out that 83 percent of them became more stressed while using email. In short, they concluded that email overload can be a significant cause of stress among email users.
So, if you’re also experiencing an increase in your stress level each time you log in to your email account and see your inbox full of unread emails then, you’re not the exceptional case and thus, we suggest you don’t fret!
Simply because you cannot stop using emails especially if you’re a business professional, it isn’t an option even but, what you definitely can do is cast out spam, newsletters, marketing and promotional emails from your inbox forever. To be precise, you can choose to manage and organize your emails better.
However, doing so requires a considerable amount of time as well as a great deal of effort. If you’re thinking that then, let us tell you that there’s an exception to it. According to which, if you use “Gmail” you can easily well-manage your inbox through setting up “labels and filters.”
Yes! Maybe you didn’t know yet that you can create both Gmail labels and filters so that you spend less time managing your email and always end up with a much better organized email inbox.
So, with that being said, today in this following post we are going to entirely focus on explaining what Gmail Filters are, how to set them up and how you can use Gmail filters— that will help you sort your emails automatically to keep your inbox tidy and in turn surcharge your productivity.
Table of Contents
What Gmail Filters Are?
Gmail Filters are a set of automation rules that allow you to sort out your emails as they hit your mailbox.
Using these rules you can simply allow Gmail to automatically send emails of different nature to their respective folders and avoid receiving all of them right into your inbox.
In other words, you save yourself from the trouble of having to organize and manage emails manually as these rules automate the process of sorting out emails and organizing your inbox thereby saving much of your precious time.
So, nowadays, most people are already using Gmail filters to properly categorize emails that are predictable or repetitive like email marketing newsletters, forwarded emails, and social media notifications for instance.
Thus, if you also want to take advantage of Gmail filters to achieve inbox nirvana then, before you begin, remember there’s some limit to their utility and that is your creativity level. To be precise, there are ‘n’ numbers of ways that you can utilize to do pretty much anything you want.
Having that said, let’s now understand the process of creating an email filter in your Gmail account—
How to Create a Filter in Gmail?
The whole procedure of creating filters in Gmail is divided into three parts wherein—
| Part I: You’ll initiate the creation of a Gmail filter using any of the 3 ways. |
| Part II: Here, you’ll choose the criteria for your created Gmail filter. |
| Part III: In this part, you’ll choose what Gmail does with emails that match the criteria of the filter you’ve created. |
Now, as you become acquainted with the entire process of creating Gmail filters, let’s straightaway look at how to execute the same—
Part I
There are at least 3 different ways to create filters in Gmail, and it is worthy enough to know all of them because you never know you’re probably going to use them all depending on the respective needs of your inbox. So, considering that, below-mentioned are the ways to create filters in Gmail:
- Way 1: Using the Search Bar – As per this, you need to first go to the Gmail Search Bar and there, simply type in a particular Keyword or Email Address that you’d like to filter out. Then, you can click on the down arrow in Gmail’s search box available in the gray rectangle form. In doing so, a dropdown menu will appear, and the same will help you to further refine your filter.
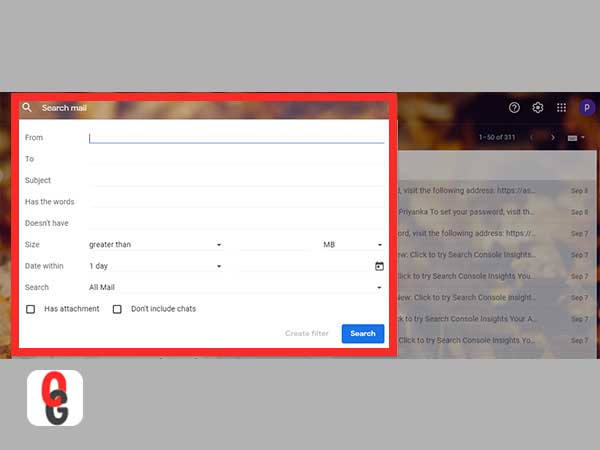
For Instance- You’d like to have all emails that you received from the email address you’ve added in the filter to go into your Primary inbox instead of your Updates folder. Or, you want all emails that contain the added keyword to be dumped into the Junk mail folder instead of your inbox.
[Note: To gain more insight about refining your filter, refer to part II of the process.]
- Way 2: Using the Setting Menu in Gmail – If you consider this way, you first have to click on the Gear icon available in the top right corner of your Gmail account screen. From its drop-down menu, choose the Settings option and then, select the Filters and Blocked Addresses tab to click on the ‘Create a New Filter’ option.

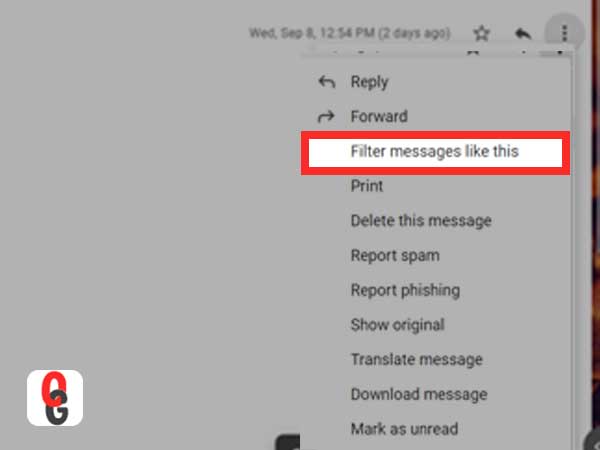
- Way 3: Using a Specific Email – In this way, you just need to open an email and click on its three-dots (vertical ellipses) from the upper-right corner of the email window to select the option namely Filter messages like this.
With either of these ways, you can complete the first part of creating your filter in Gmail and get on to the filter creation form i.e., second part of the process.
Part II
Here, in this section, you’ll be offered with the following multiple options to choose criteria for your Gmail filter that you’re creating—
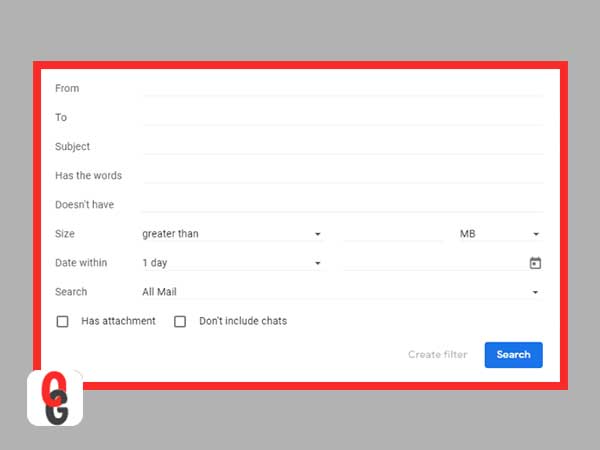
| From | It allows you to filter emails sent from a specific or multiple addresses email addresses that you want to avoid. For instance: You don’t want to receive emails from Google Search Console Team. |
| To | It allows you to filter emails sent to a specific or multiple email addresses. For instance: A colleague or someone else outside your organization network. |
| Subject | It allows you to filter emails that include a particular keyboard in the subject line. For instance: Keywords such as SEO. |
| Has the words | It allows you to filter those emails that carry specified keywords and phrases in the email body. For instance: Keywords such as Won and Phrases such as Congrats! You’ve won a prize. |
| Doesn’t have | It allows you to filter emails that don’t contain or miss out those keywords you specify. |
| Size | It allows you to refine those particular emails that are either larger or smaller than a specific size limit. |
| Has attachment | It allows you to filter all those emails that contain attachments with them. For instance: Emails that along with body text also include any sort of document in the form of PDF, Excel sheet, or Word file. |
| Don’t include chats | It allows you to avoid messages from Google Chat or Google Hangouts Chat. |
Upon selecting all the criteria you need for your Gmail filter, you can then click on the Create Filter which is in the bottom right corner of the screen.
In doing so, a pop-up will appear in front of you and to know its significance lets carry yourself straight onto the third part of this filter creation process.
Part III
In this last section, you’re given the opportunity to specify how the filter handles emails matching those criteria. To be precise, you need to choose what Gmail should do with the filter you’ve created.
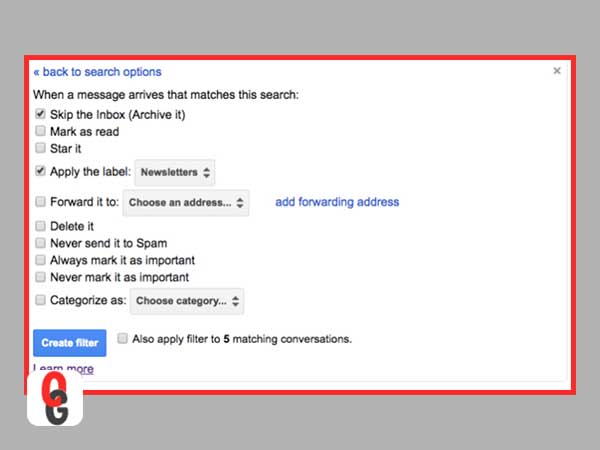
So, like we’ve already mentioned above that when you click on Create Filter option, a pop will appear carrying these several options for you to apply either some or all with your Gmail filter—
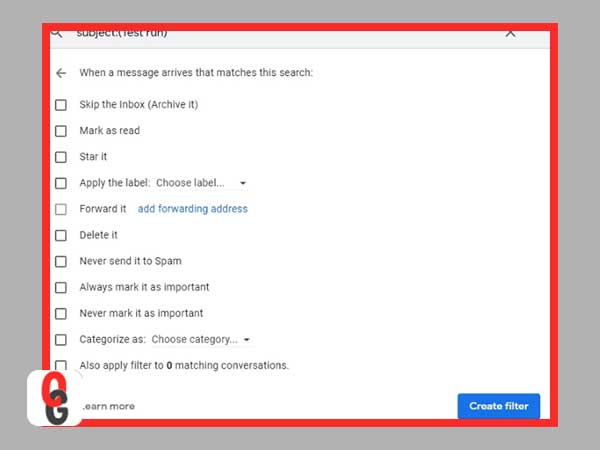
| Skip the Inbox (Archive It) | It will allow Gmail to automatically archive those incoming messages/emails that you don’t want to see in your inbox. |
| Mark as read | It will allow Gmail to automatically mark messages/emails as already-read items. |
| Star It | It will allow Gmail to automatically ‘star’ specific messages/emails. |
| Apply the Label | It will allow Gmail to automatically apply an existing or new label to incoming messages for their easier categorization. |
| Forward It | It will allow Gmail to automatically forward messages/emails to a specific email address. |
| Delete It | It will allow Gmail to automatically delete messages/emails and send them to the trash. |
| Never Send It to Spam | It will allow Gmail to automatically prevent emails from being sent to spam folders. |
| Always Mark It as Important | It will allow Gmail to automatically add the importance marker (the chevron-like symbol) to messages/emails. |
| Never Mark It as Important | It will automatically allow Gmail to never mark messages/emails as important. |
| Categorize as | It will allow Gmail to automatically sort out incoming emails/messages to be sent in different folder categories like Primary, Social, Forums, Updates, or Promotions, etc. |
| Also Apply Filter to Matching Conversations | It will allow Gmail to automatically apply the selected conditions to every email (new, archived, and deleted) in your account that match the filter criteria you set. |
Now, your Gmail filter is ready to be applied, and hence, without wasting any further second, you can click on the Create Filter option to conclude the process.
However, it is not necessary that on the very first attempt your filters are applied correctly or even if so, may be at some point of time you no longer need that filter, or you may want to edit the same to reflect your current needs.
So, if such is the case then, what will you do?
Of course, you need to learn the process of editing and deleting the Gmail filters you’ve created—
How Do You Edit and Delete Gmail Filters?
It’s easy to edit or delete Gmail filters if you execute the given steps correctly:
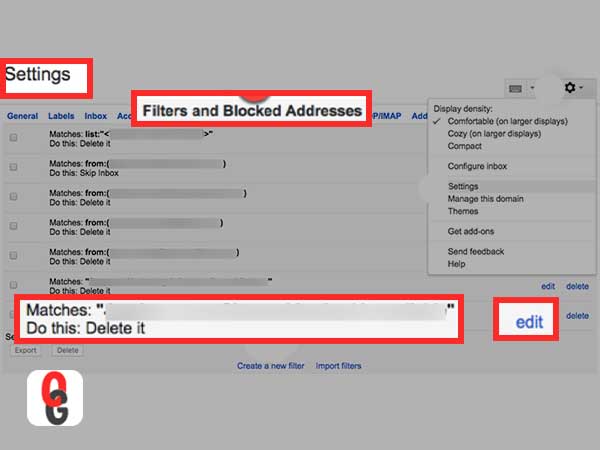
- Initiate the process by clicking on the Gear icon from the homepage of your Gmail account.
- In doing so, a menu will appear in front of you. From that menu list, choose the Settings option.
- Then, you’ve to simply select the Filters and Blocked Addresses tab.
- On the same tab, a list with all your filters will be displayed and from the same list, you need to find that specific Filter you want to edit/delete.
- Once you’re able to locate the filter, you’ll see an option to either edit the filter or to delete it forever. So, from the two, you’ve to select one based on your requirement—
- If you click on the Edit link then, it opens up a dropdown menu which allows you to refine your filter criteria and its behavior like you did in Part II and Part III earlier.
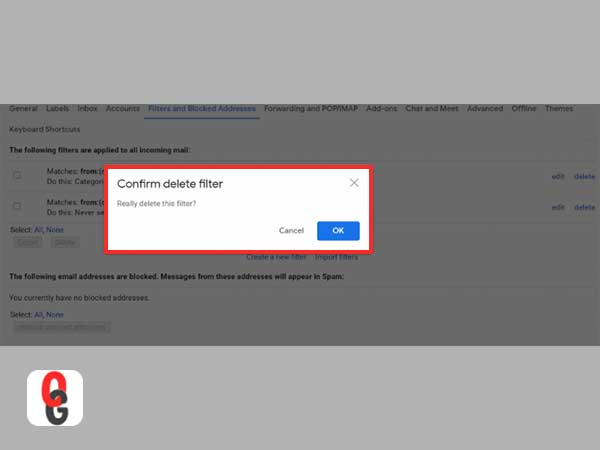
- On the contrary if you click on the Delete link then, as compared to editing a filter, deleting it is way easier because you just have to confirm that you really want to remove the selected filter.
By now, you’ve already learned how to create Gmail filters and how you can edit or delete them, right!
Then, what next?
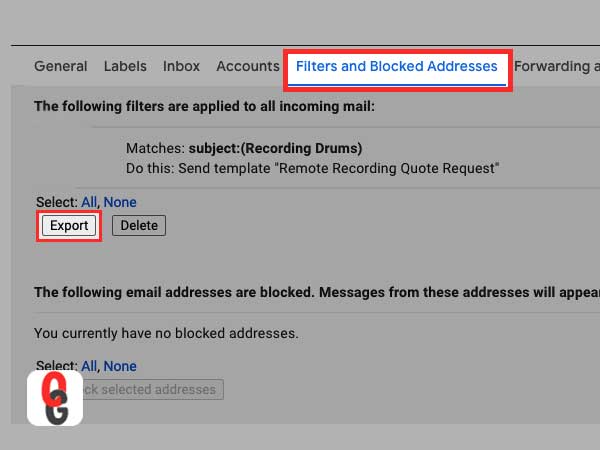
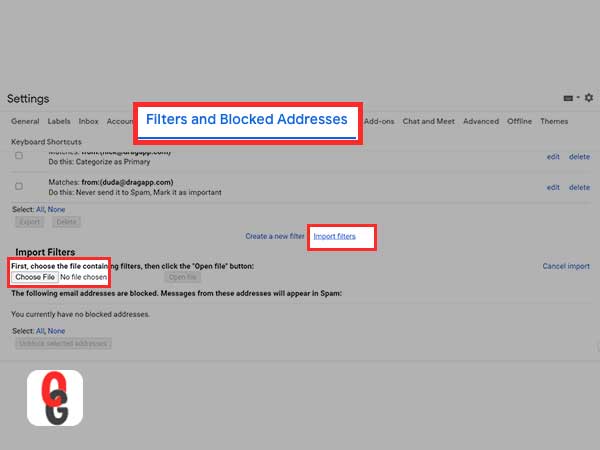
How about understanding the usage of import and export filter options? So, if you want to implement Gmail filters in your other accounts that you may have, or even with friends and colleagues that also need to know about this inbox- organization hack then, have a look at the process of both (exporting and importing) filters—
How to Export and Import a Gmail Filter?
Now, before you jump into the last section that explains the different ways you can use Gmail’s main filters; let’s have a quick look at the run-down of the operators that are supported by Gmail and their functions to perform detailed search operations—
Precise Gmail Filters with Operators
| Operator | Function |
| AND | This tells Gmail to combine one search term with another using an invisible AND operator. |
| OR | This operator tells Gmail to filter either one thing OR another and not both. |
| – | The minus sign operator tells Gmail to (-) exclude a specific keyword, email address, or company from the filter. |
| ” “ | This quotation mark operator tells Gmail to look for an exact (” “) match of the text. |
| () | It tells Gmail to surround items with () brackets in order to group those items together. |
| * | This wildcard filter of Gmail is denoted by asterisk (*) operator and tells Gmail to look for a specific keyword, domain or company emails for filtration. |
Try These 8 Must-Have Gmail Filters to Organize Your Inbox
Here, finally we’ve explained some of the most used Gmail filters that help you manage your inbox in a better way and in turn boost your productivity:
Gmail Filter 1: Auto-Delete Marketing and All Unwanted Emails
If you’re fed up with getting newsletter and marketing emails in your inbox then, you know manually unsubscribing from each of them takes a plenty of your time, right! So, instead of wasting your time doing this manually, you can use this filter and get Gmail to automatically do it for you.
This filter allows Gmail to send those messages/emails to the trash that contains keywords like “Unsubscribe” in the content. So, in order to apply it, execute these steps—
- Open Gmail.
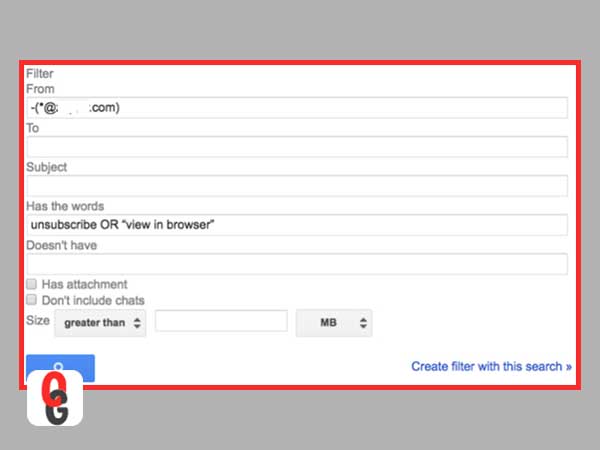
- Click on its Search Bar to open the “Create Filter Form.”
- On the same form, navigate to the “Has the Words” field and there, type in “Unsubscribe.”
- Following that, click on the “Create filter with this search” link.
- Next, you’ve to specify what Gmail does with this filter and for that, simply check the box next to the “Delete it” option.
- Once you’ve done that, click the “Create filter” button to finally apply the filter.
Now, you’ll see that most of the emails that contain the word unsubscribe will be automatically sent to the trash folder by Gmail.
However, if adding just this ‘Unsubscribe’ Keyword won’t help Gmail to catch everything then, you can simply edit your filter to include other words that usually seen in newsletters, marketing emails and even in any kind of recurring emails you might get, such as bills from your utility company, receipts from Amazon, or in those forwarded emails.
To do so, you’ve to open your filter to edit it, and then, need to add all those words (separating each with the OR operator) that you want to filter on. For example- “Unsubscribe” OR “Click Here” OR “View in Web Browser” OR “View Online” and so on.
Gmail Filter 2: Auto-Archive Marketing and Other Specific Emails
In case you’ve a doubt that the above added filter might also catch a personal email and delete it permanently then, consider this Gmail filter that auto-archives newsletters and marketing emails.
So, in order to create this filter that allows Gmail to automatically archives newsletters, and marketing emails containing keywords like Unsubscribe, you can simply perform these steps—
- On Gmail’s search bar, click the down arrow triangle.
- Then, type in “Unsubscribe” in the “Has the words” field of Filter Form.
- Following that, click the “Create filter with this search” link.
- In continuation, check the box next to “Skip the inbox (Archive it)” action.
- Once you’re done, just hit the “Create filter” button.
Now, albeit you won’t be able to see the word ‘Unsubscribe’ containing emails in your inbox, you’ll always have access to them in your archive folder.
[Note: In addition to this, you can even use this filter to archive those companies’ emails that often send promo codes, sales info and similar things.]
Gmail Filter 3: Auto-Label Emails to a To-Do Location
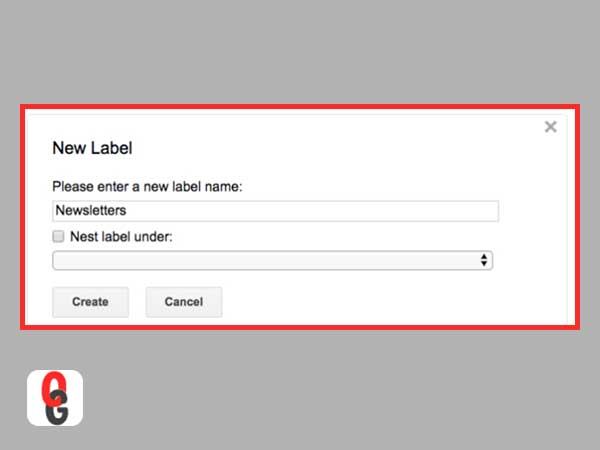
Other than the above two, there’s another option also as per which you can allow Gmail to send newsletters and marketing emails to a to-do location. So, if you don’t want to archive those emails and want to read them without letting them clog up your inbox then, this is your ultimate way for that. However, if you already don’t have a to-do location then, first create it in Gmail simply by—
- Expanding the menu in your Gmail sidebar
- Then, scroll down until you see the “Create new label” link and click the same.
- Once you’ve done that, enter a name for your new label, and just click the “Create” button.
Once you have a label for newsletters and marketing emails, you can create your filter via following these given steps:
- Open the “Gmail Filter Creation Form” in the same above-mentioned manner.
- Then, type in “Unsubscribe” in the “Has the words” field.
- After typing the keyword, click on the “Create filter with this search” link.
- Following that, check the box right next to “Skip the inbox (Archive it)”
- Along with it, also check the box right next to “Apply the label.”
- In addition, use its dropdown menu to select the label.
- After doing so, just don’t forget to click on the ‘Create Email Filter’ option.
Now, when you’re done, Gmail will automatically move all those marketing emails that contain the word unsubscribe to the label you’ve selected.
Gmail Filter 4: Move, Archive, or Delete Specific Emails
While the above three filters show you how to use filters to individually delete, archive, and move emails but, if you want to apply all these filters to a specific type of emails or to emails from specific senders then, this is that precise filter you require creating.
So, to use this filter, you can consider these three ways (as per your requirement and needs)—
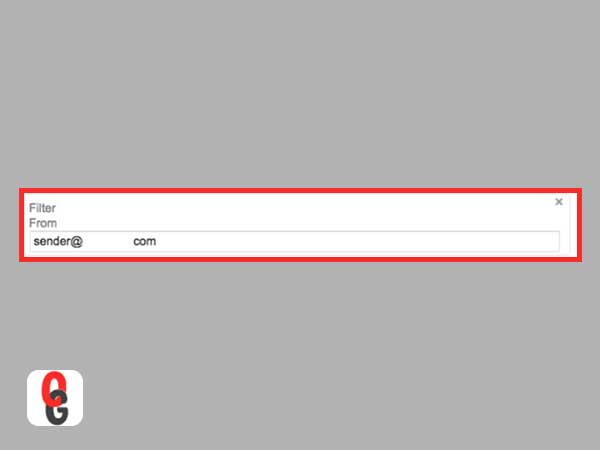
Filter by Specific Sender:
In order to allow Gmail to automatically delete, archive, or label emails from one email address you can simply type that email address into the “From” field of the Create Label Form. Following that, you just need to select the most appropriate action (delete, archive, or label) for the filter and hit the “Create Filter” button.
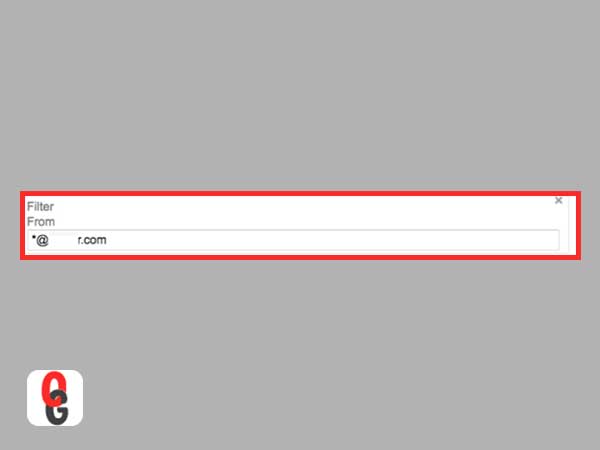
Filter by Email Domain:
Oppositely, if you want to let Gmail automatically delete, archive, or label emails for all senders of a specific domain or company then, you’ve to type a “Asterisk” symbol like [*] before @domain.com email suffix, for example, *@domain.com. In doing so, you allow Gmail to apply this filter to all those emails that you receive from accounts on that domain.
Keep out certain Operator from Mass Filters:
Similarly, if you allow Gmail to automatically delete, archive, or label most marketing emails but want to receive them for one specified company then, apply this filter that tells Gmail to exclude a particular sender/email address/company/domain from applying the filter.
So, if you need to apply this filter then, type with minus sign for instance “-username@domain.com” into the “From” field of the Create Filter Form, despite the fact you’re also applying filters on subject, keywords, and/or some other criteria like “*@domain.com” this.
Gmail Filter 5: Auto-Empty Your Spam Folder
This is another useful Gmail filter that comes in when you’re tired of spam emails that are piling up in your spam folder. To be precise, you can use this filter if you want Gmail to automatically and permanently delete spam emails as soon as they appear in your account.
Well, everyone wants to keep their respective accounts spam free, isn’t it and considering that, here are the steps for applying this respective filter—
- On Gmail Filter Creation Form, scroll down to the “Has the words” option.
- In that, type “is:spam” and click on the “Create filter with this search” link.
- Next, you’ve to simply click on the “OK” button under the “Confirm creating filter” modal.
- Upon doing so, also check the box next to “Delete it” action.
- And, as obvious, hit the “Create filter” button to apply this filter on your Gmail account.
Once you apply this filter, you allow Gmail to automatically empty your Spam folder each time it ends up congested with spam emails.
Gmail Filter 6: Auto-Build a To-Do Queue
This Gmail filter works more like a productivity app and tool that sends reminders of things one needs to do. So, if you also like to keep a to-do list is your inbox so that Gmail notifies you of those important things you need to do for instance, send you links to those articles that you want to read and more such similar things then, here’s how to set this filter up for your Gmail account—
- Firstly, like above you’ve to create a to-do label, in case you don’t have one already.
- Once done, click the down arrow triangle in Gmail’s search bar to open “Filter Creation Form.”
- On the same form, you’ve to locate the “From” field and type in your “Email Address” in that.
- Following that, click the “Create filter with this search” link and check the box right next to “Skip the inbox (Archive it)” action.
- Upon doing so, you need to also check the box next to “Apply the label.”
- In addition, use its drop-down menu to select your “To-do-label.”
- Now, in the end, click on the “Create Filter” option to finally build a to-do-queue.
[Note: If you want you can also use this filter for those emails that your boss and your clients send you always with tasks that you need to complete.]
Gmail Filter 7: Create Multiple Inboxes for Different Accounts
If you’re a kind of person who’ve multiple accounts and manages them all from a central account then, you can consider applying this filter as this allows Gmail to send emails to each address to appear in separate inboxes of yours.
So, if you find this filter relevant for your case then, here are the steps to create it:
- Begin by creating labels for each of your accounts.
- Once you finish doing so, open the “Create Filter Form” using Gmail’s search bar.
- There, you’ve to type the email address of your first account into the “To” field and then, you can simply click on “Create filter with this search.”
- Following this, you need to check the boxes next to “Skip the inbox (Archive it)” and “Apply the label” to select the most appropriate label from its dropdown list.
- Once done, click the “Create filter” button.
Now, you’ve to repeat these above steps for the rest of your additional account also in order to allow Gmail to automatically move emails from your inbox to individual ‘account-specific’ inboxes.
Gmail Filter 8: Auto-Delete Old Emails
Last but not least, this is a kind of helpful Gmail filter feature that lets you perform a search using any filter criteria you’ve created to automatically delete all archived emails that match that specific filter.
For instance, if you’ve applied the above [Gmail filter 2] to automatically archive newsletters and marketing emails, but now you want to delete them to free up some space in your account then, this filter comes to play its role.
So, you can definitely consider trying it when your mailbox is running out of space, and you need to delete some archived emails that you no longer require.
Let’s see how:
- Begin by clicking the “Gear icon” of your Gmail account.
- Then, choose “Settings” to select the “Filters and Blocked Addresses” tab.
- Following that, you need to click on the “Edit” link which is next to your auto-archive newsletter and marketing emails filter.
- Next, click on the “Continue” button without changing any of the filter criteria on the Create Filter Form.
- Now, uncheck the “Skip the inbox (Archive it)” box and instead, check the “Delete it” box.
- In addition, check the box next to “Also apply filter to # matching conversations” action followed by clicking the “Update Filter” button.
Once you finish doing so, Gmail will automatically delete all those emails that were earlier archived by your ‘Auto-archive Newsletters and marketing emails’ filter and should free up enough space in your mailbox.
[Note: Right when Gmail ends up with the deleting process, you again need to edit your filter to set it back to archiving the emails because when necessary you can repeat the process and apply this filter to free up space in your account.]
Bottom Line
That’s all! This is the entire guide on what all you require knowing about Gmail filters that is the best ultimate solution for managing and organizing your inbox instead of giving up on using email.
In short, with Gmail filters, you always come back to a cleaner, sorted and more streamlined inbox.
FAQs
Q: What do Gmail filters do?
A: Gmail filters help you create rules that Gmail uses to handle all your incoming emails. Using these rules, you automate the process of organizing your inbox by letting Gmail completely manage your email on your behalf.
Q: How many filters can you have in Gmail?
A: Albeit, there’s no maximum limit for creating filters in Gmail, you can create as many filters as you want but, it is worth noting that you’re allowed to create a total of 20 “Individual Filters” and in them, you can add as many additional filters as you wish.
Q: How do I move emails directly to a folder in Gmail?
A: In order to move emails directly to a specific folder in Gmail, you need to—
- Open the email.
- Then, click on the ‘Move to’ button from the top-menu bar and simply select the destination folder.
In doing so, you’ll see a notification for the verification that your message was moved, and it applies to your specified emails that you receive in your Gmail account.
Q: How do I manage Gmail filters?
A: To manage Gmail filters, open Gmail, click on its Settings, select Filters and Blocked Addresses and then, locate the filter to either Edit or Delete it forever.
Q: How do I filter emails in Gmail app?
A: If you’re using Gmail on your mobile and wondering about how you can filter emails in Gmail app then, there’s no direct way of doing it instead you need to—
- Open your mobile web browser.
- Visit this “https://mail.google.com/mail/h/” HTML version of Gmail.
- There, scroll down to the bottom and select “Switch to the desktop version.”
- Then, click the Create a Filter option followed by choosing a specific criterion for the same.
- In addition, select the action also that you’d like Gmail to take on emails that match your filter criteria and then, click “Create Filter” for creating Gmail Filters in Mobile, that’s it.

Strategies of Implementing DevOps for Success

The Top 5 Email Extractor Apps of 2024

How Can QR Codes Simplify Your Daily Routine:…
All-Inclusive Guide on RTasks Login at RTasks.Net!

SPYX Review: The Ultimate Spy Tool for Worried…

From Exams to Exercise: How Health and Wellness…

Spotify Receiptify: Learn How to Create & Share…

Unlocking the Power of Money Transfer: Simplifying the…

Secure and Swift: Exploring Online Money Transfer Options

What Is Spotify Color Palette, How to Create…

Maximizing ROI: Tips for Cost-Effective Direct Mail Campaigns