Fix “This Facebook Page Isn’t Eligible to have a Username’ Error with This Guide!
As you know anyone of you can create individual ‘Page’ on Facebook to promote your services or your brands.
Using a Facebook page, you can do good marketing to make your brand or business more profitable because Facebook has billions of daily active-users that you can target with minimal efforts.
To be precise, you can create a Facebook Page to showcase your corporate image and to well-manage your professional presence on Facebook which is currently the world’s most used social media platform.
However, only creating a Facebook page is not enough, you also want it to be found well, right!
Therefore, Facebook allows page owners to generate a suitable address for their business/fan page.
So, after creating a Facebook fan page/ Facebook business page, you can choose a short and catchy short URL (Vanity-URL) address, which Facebook calls as “Username.”
A “Facebook @username” appears in the URL of your Facebook page and gives it a nice URL address without a lot of numbers attached on the end of it.
Not just that, it also creates a unique and direct link to your Facebook page so that your Facebook Page can be easily tagged by other Facebook users.
What is a Username?
On any Social Media platform or Forums or Websites, a “Username” is our identity and with our username, others not only find us and send us a direct message but also associate us with our responses and activities.
Generally speaking, the process of adding or even changing a username to a Facebook page is very smooth and straightforward.
However, chances are, when you try to create a username, you may encounter an error message saying:
“Username Isn’t Available, This Facebook Page Isn’t Eligible to Have a Username”
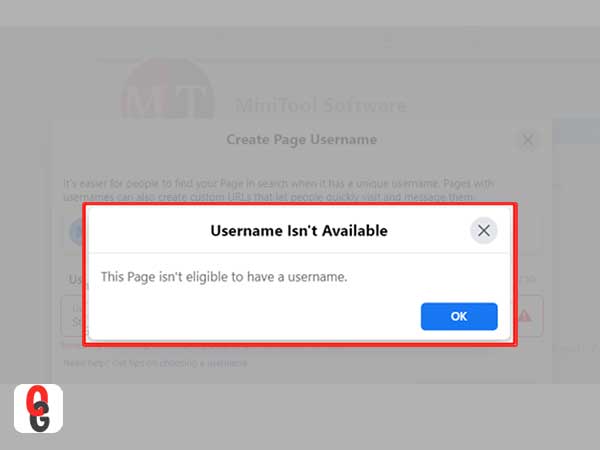
Already, some Facebook users have encountered “This Page is not eligible to have a Username” error that prevents them from being able to properly create a username for their page.
So, like others, if that’s the case with you also then, do you know why your Facebook page is not eligible to create or change a username and how you can get rid of this error?
No!
Then, you’re reading the right post.
Below, we will be addressing this issue by deploying some desirable fixes that will most probably rectify this glitch on Facebook.
To start, let’s discuss the reasons due to which the error might be triggered in the first place.
Reasons: Why Isn’t My Page Eligible to have an FB Username?
Albeit, there can be different reasons for facing “this page isn’t eligible to create a username” error but, according to Facebook and a lot of users’ feedback, you receive this error mainly for the following reasons—
- Your Facebook page is new and unless it has at least 24-page likes and one post, you cannot create a username for it.
- The username you want to add to your Facebook page has already been taken by another user.
- You are not an Admin on the Facebook page for whom you’re trying to create a username.
- Your Username is either too short or too long to be added to your Facebook page.
- The Facebook account that you’re using might not have been properly registered on Facebook platform or its activity might have been limited.
- Your Facebook Profile and Page that you are using might not be verified and thus, Facebook won’t let you create a username for the same.
Additionally, it is also worth mentioning that Facebook has several rules for setting up a Facebook page username. This means, there are some conditions that must be met to be able to create a Facebook Page Username.
But, Facebook does not indicate these prerequisites itself and instead throws the above, meaningless error message if they are not met.
So, the solution is to read about them yourself!
In this regard, you can refer to Facebook’s Guidelines for Usernames to help you create a custom username. Additionally, you can learn more about username policies in the Facebook Terms.
Overall, your Facebook page must meet the set requirements to be able to create a username because if the requirements are not met, you are likely to get – ‘This username is not available’ error.
Got it!
Now, once you have met the requirements, try to create a username for your page to check if it helps you in resolving the error encountered.
How to Create a Facebook Page Username?
To set/create a username—
- Click on ‘Info’ in the left menu of your Facebook page.
- Then, click on ‘Create Username for Page’ option which is at the top of the menu.
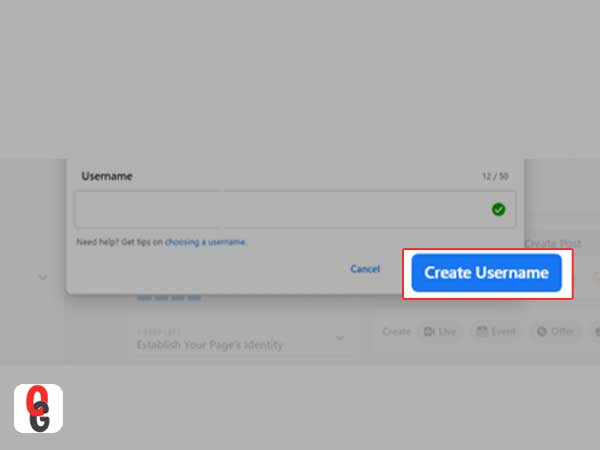
- Now, enter a username for your page and if it is available, simply click on ‘Create Username.’
However, even after meeting the requirements, if you still get “This Facebook page is not available to have a username” error; it can be resolved by assigning an alternate account as admin and making the necessary changes.
Solution: Use an Alternate Facebook account to Fix ‘This Facebook Page Isn’t Eligible to have a Username’ Error!
Most of the Facebook users have stated that adding another Admin to their Facebook page allows them to create a custom URL username successfully. So, if this solution works for them, hopefully it will work for you too.
Let’s see—
- Step 1: Open the web browser of your choice and visit the Facebook webpage using it.
- Step 2: Then, enter the login credentials to log in with your main Facebook account.
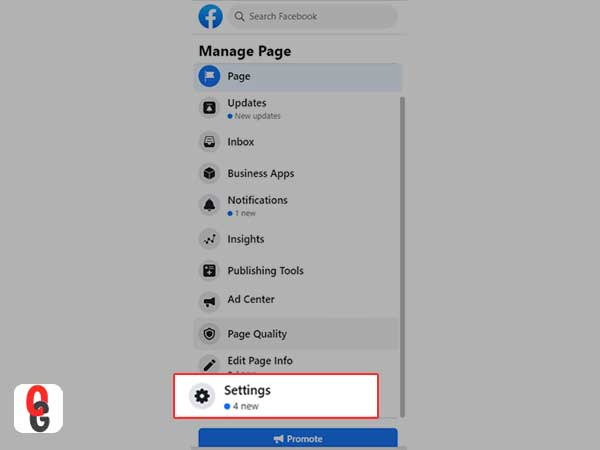
- Step 3: Once you’re logged in, go to ‘Settings’ to open the ‘Page Roles’ option.
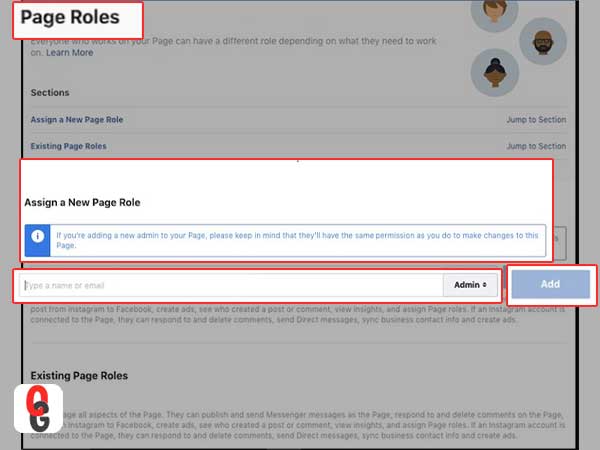
- Step 4: Next, in the text box under ‘Assign a new Page role’ type the ‘Name or Email address’ of a person (from your friend list who doesn’t manage any other FB pages) to add as an administrator for your page and then, select that person’s ‘Profile’ from the list that appears.
- Step 5: After that, click on the ‘Editor’ option, change it to ‘Administrator’ and click on the ‘Add’ button.
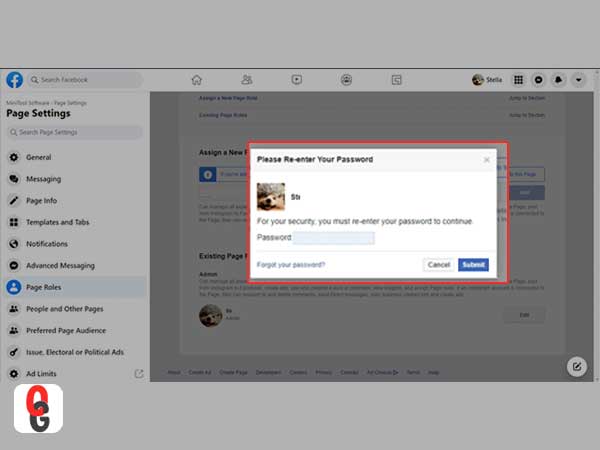
- Step 6: Now, you will see a small pop-up window in which you have to re-enter your password and click on ‘Submit’ button. By doing this, the person you have selected will receive a notification that they have been made an administrator of your Page.
- Step 7: Following this, you can ask the assigned admin to log in to their account and change the username.
Alternatively, if you know the assigned administrator’s login credentials then, ‘log in’ to their account and do it yourself by following these steps—
- Log in to the admin account and once you’re logged in, click on the arrow icon in the top-right corner to select the ‘Manage Pages’ option.
- From it, select the ‘Page’ you want to set the username for.
- After selecting the page, click on ‘About’ and then, select ‘Create Page @Username.’
- Now, enter the ‘Username’ that you want to set and check if it is available as each page can only have one unique username so that other Facebook users can find and tag you using it.
- Upon checking the availability, click on ‘Create a username’ and congratulations! Your username for your Facebook page has been created and is ready to use.
[Note: Once the username is set, don’t forget to remove your friend as the admin of your Facebook Page.]
Bottom Line
That’s all! Hopefully, now you have an idea of how minor this problem is and how easily using the solution we have mentioned in this post, you can get rid of “This Page isn’t eligible to have a username” error.


Understanding How Can You See If Someone Is…

A Guide on Where and How to Find…

How to Find Your Saved Drafts on Facebook?…

Why Can’t I Add Someone on Facebook? Uncover…

Free Facebook Reels Downloader for Android Mobile
Know How to Easily Deactivate or Delete Facebook…

Try These 12+ Fixes for Facebook Messenger Not…

How to See Who Viewed My Facebook Profile…

With This Guide, Recover Your Disabled/Suspended Facebook Account!

Facebook App is not working? The Best Corrective…

Facebook is down? How to check and fix…