How to Create a Discord Account and Get Started with Using Discord?
Whether you’re new to the platform or looking to enhance your Discord experience, this guide has got you covered.
Here, learn how to create a Discord account, easily manage your friends list, seamlessly join its servers, and customize your notification settings.
By the end of this guide, you’ll be fully equipped to dive into the exciting world of Discord with confidence.
So, having said that, let’s get started—
Discord is a chatting site and app that has everything a user wishes to have in communication software. It enables users to connect with friends, participate in servers, engage in text, voice, or video chats, and enhance communication by adding emojis on Discord.
How to Create a Discord Account?
For gamers and various interest groups, creating Discord account is the initial step toward joining one of the most popular communication and community platforms.
The process to create Discord account usually requires entering basic information like an email, username, and password, followed by verification steps to ensure security.
Worth noting, however, is that Discord’s accessibility shines through in its account creation options, making it convenient for users across a variety of devices.
This means, you have the flexibility to create Discord account— online through the website, through the desktop application, or using the mobile app.
How to Create a Discord Account Online?
If you’re looking to try out Discord, the browser-based version is the optimal choice for a Discord create account. So, simply follow these steps for creating Discord account online—
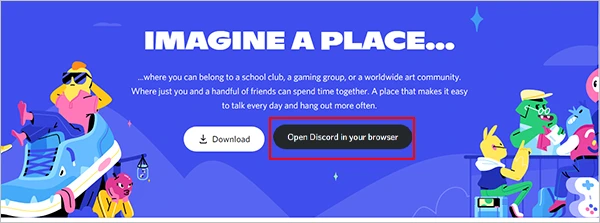
- Step 1: Open the web browser of your choice, paste this link ‘https://discordapp.com/register’ in the URL address bar and hit the ‘Enter’ button to reach Discord’s official website.
- Step 2: On reaching the discord sign up page for Discord create account, click on ‘Open Discord in your browser.’
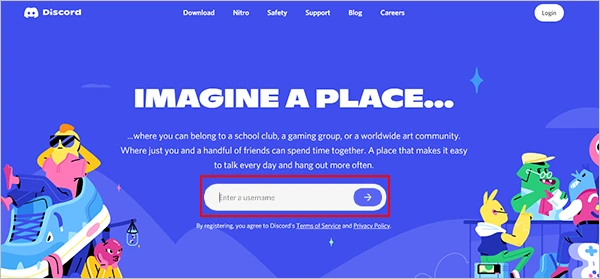
- Step 3: Then, enter the ‘Username’ that you want to use and click the arrow.
- Step 4: In continuation to the Discord create account process, complete the ‘Captcha’ as you’re directed.

- Step 5: Next, a pop up will appear and in that, enter your ‘Date of Birth’ and hit the ‘Next’ button.

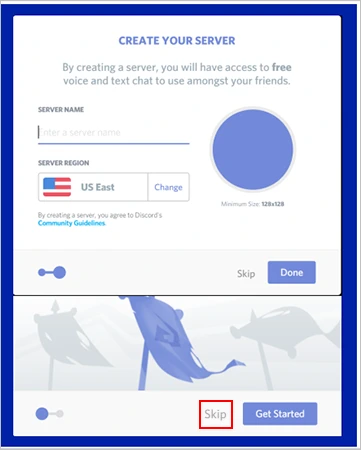
- Step 6: Again, a pop-up will appear, offering the option to ‘Get Started’ with a new server or skip to complete your create Discord account process. In that pop-up, click ‘Skip’ or the ‘X’ icon to continue.
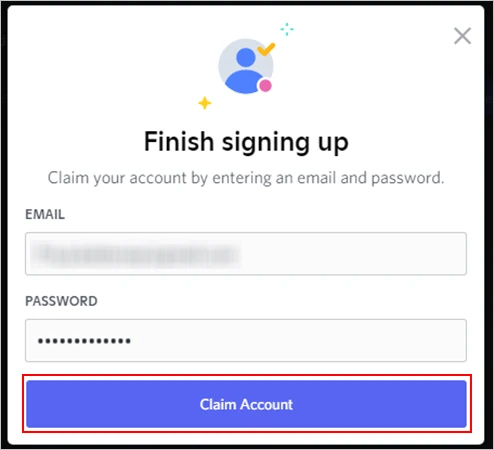
- Step 7: Afterward, Discord asks you to secure your account and in response, you must provide the required information including your ‘Email address’ and ‘Password.’
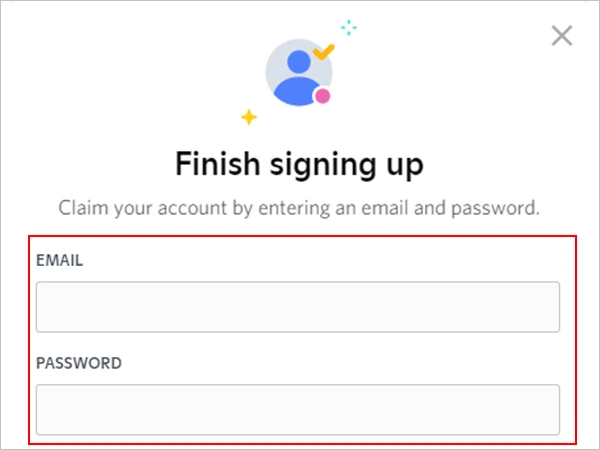
- Step 8: Once you’ve filled in the required information, click on the ‘Claim Account’ button.
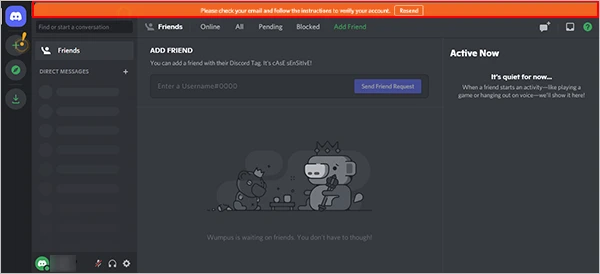
Now that you have successfully completed steps of Discord create account process and created your Discord account, you will be asked to verify your email before allowing you full access to your Discord account.
So, to do this—
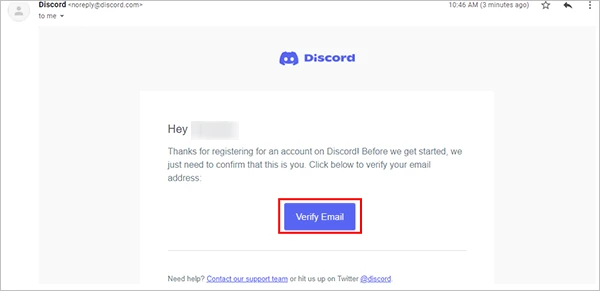
- Step 1: ‘Log in’ to your email account.
- Step 2: Then, open the ‘Confirmation email’ from Discord.

- Step 3: After that, click the ‘Verify Email’ button inside the email. In doing so, discord will open, confirming your email verification.
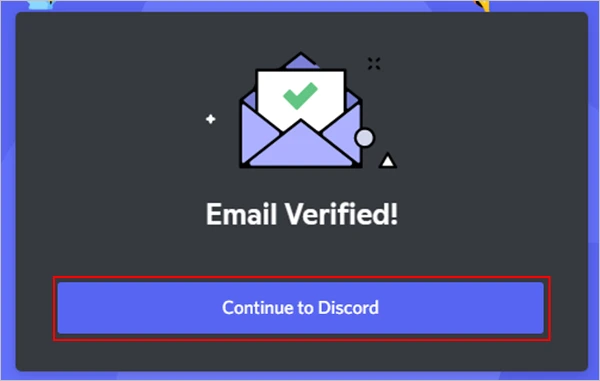
- Step 4: Once you’ve verified your email, click the ‘Continue to Discord’ link.
How to Create a Discord Account on the Desktop and Mobile App?
If you prefer to use the Discord desktop or mobile app for Discord account creation then, follow these steps to get started with creating discord account—
- Step 1: Firstly, you’ve to ‘download Discord for free’ on ‘desktop’ or on mobile/tablets through the ‘Google Play Store or Apple App Store.’
- Step 2: Once you have downloaded it on your device, click on ‘Sign up for Discord’ option.
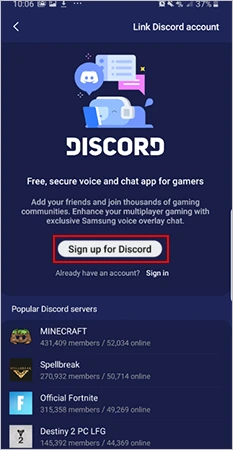
- Step 3: Then, choose a Discord sign up method and fill out the ‘Create an account’ form with relevant information, including the ‘Email Address’ you will use.
- Step 4: After that, create a desired ‘Username,’ set a ‘Password,’ and hit the ‘Next’ button.
- Step 5: Now, enter your ‘Birthday’ and tap ‘Create an account.’
- Step 6: Next to this, choose to upload a ‘Profile Picture.’ However, occasionally, profile pictures (PFPs) may become blurry during the upload process. So, if your PFP appears blurry, make sure to address the issue immediately. Alternatively, if you prefer not to upload a PFP at this time, click ‘Skip,’ then proceed by tapping ‘Next.’
- Step 7: Optionally, you can choose to be searchable on the platform using your ‘mobile number or e-mail address.’
- Step 8: Finally, tap ‘Next’ to get started.
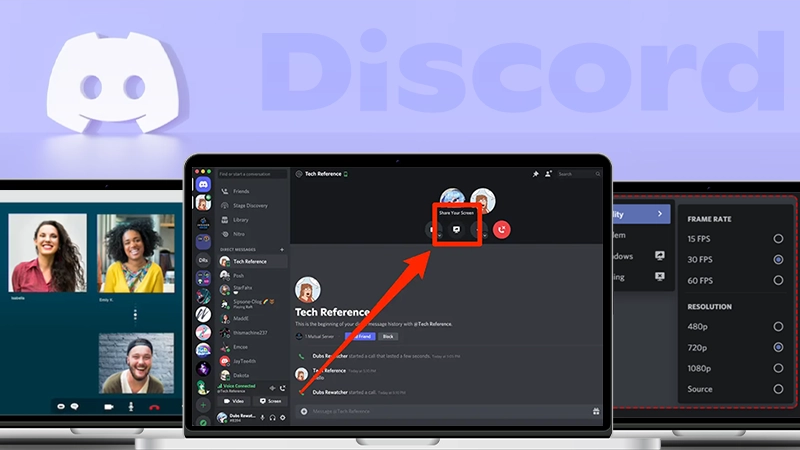
Once you’re done setting up your account, you can start exploring and enjoying Discord’s various communities and features, such as screen sharing. It allows you to share your screen on Discord with multiple people in real time and make it easy to discuss your activities.
Basically, getting started on this platform is a breeze. After completing the Discord sign up process, you simply need to add and manage your friends on the platform to connect with individuals who share your interests.
How to Add Friends and Create a Discord Friends List?
- Step 1: In order to add friends and create a friends list, head over to the Discord Home Page.
- Step 2: Then, click on the ‘Add Friend’ button which is located at the top of the Home Page.
- Step 3: Next, enter a ‘Username’ that in the future will be the “DiscordTag” of the friend you wish to add.
- Step 4: After that, you just need to click on the ‘Send Friend Request’ option.
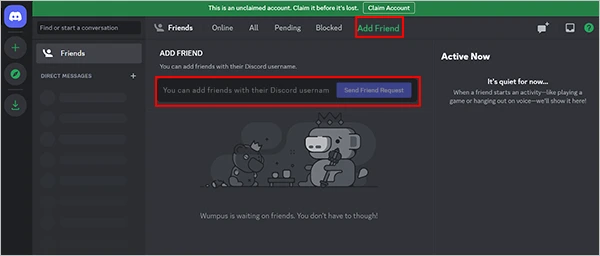
- Step 5: Now, when the other user accepts your friend request, they’ll appear in your account’s friends list.
In relation to this, it is worth noting here that Discord, like any social media platform, can have its share of unpleasant individuals. But fortunately, you can easily report someone on Discord and block such users for offensive behavior or other reasons to make your experience more enjoyable.
Now that you’ve created your friends list, you can explore communities by joining a server that matches your interests and preferences.
How to Join a Discord Server?
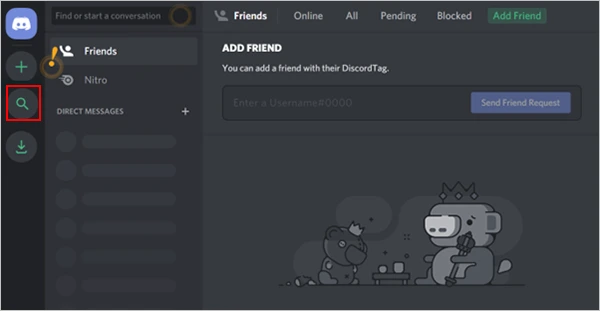
- Step 1: On the platform, click the ‘Magnifying Lens’ symbol, type your search term, and press ‘Enter’ to start searching for Discord servers.
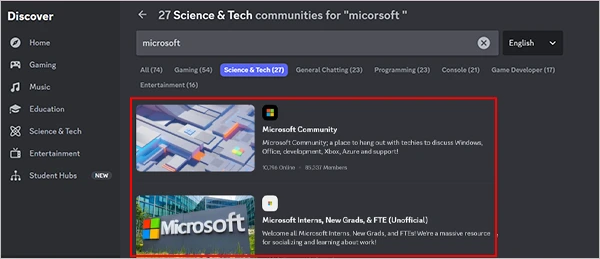
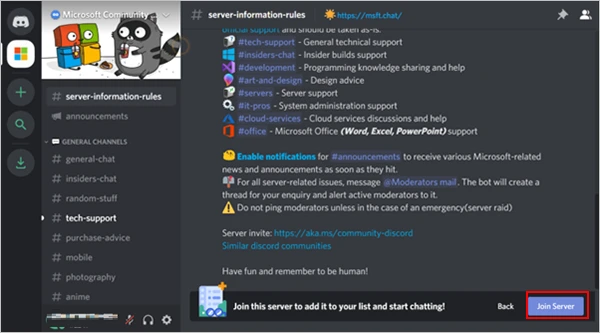
- Step 2: In doing so, the search results will show a list of servers and you’ve to click the option to explore the ‘server homepage’ of the one that interests you the most.
- Step 3: After that, click on the ‘Join Server’ option which is located at the bottom of the server homepage.
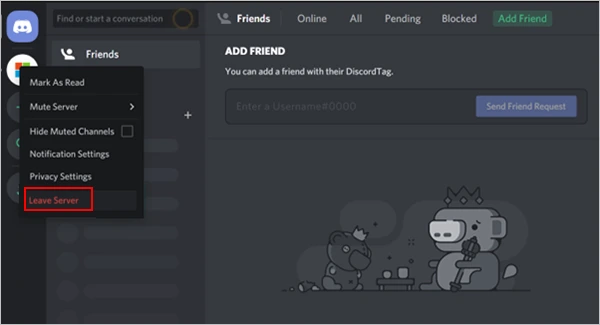
- Step 4: Upon doing so, the ‘icon for the new server’ will appear on the left side of the platform homepage for quick access. However, if you wish to leave the server at any given time, simply ‘right-click on its icon’ and choose the ‘Leave Server’ option.
Finally, don’t forget to customize your notification settings to ensure you stay connected without unnecessary distractions.
How to Change Notification Settings in Discord?
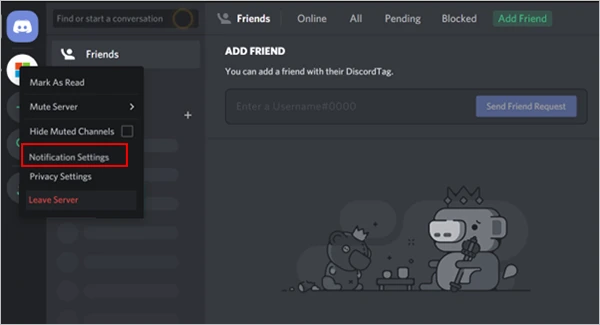
- Step 1: Start by right-clicking the ‘Server Icon’ of the server you wish to customize notification settings for.
- Step 2: Then, from the context menu that appears, choose ‘Notification Settings.’
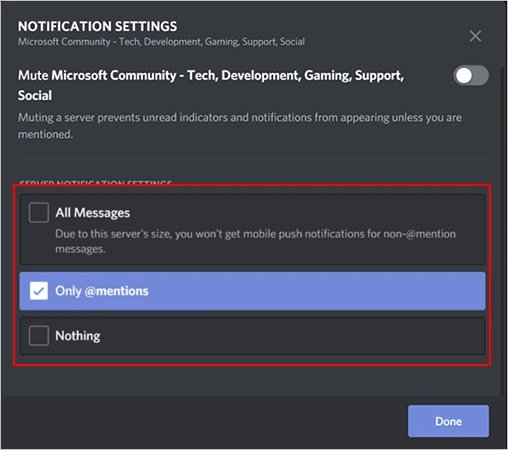
- Step 3: Inside the notification’s settings, if you choose the first option, it allows you to ‘Mute’ the entire server, which is useful when you prefer not to be interrupted by notifications but want to review them later.
- Step 4: Additionally, you can find the following options to customize your preferences;
- All Messages: To always get the notification.
- Only @ Messages: To get notification only when someone tags you using @ symbol.
- Nothing: In order not to receive any notifications.
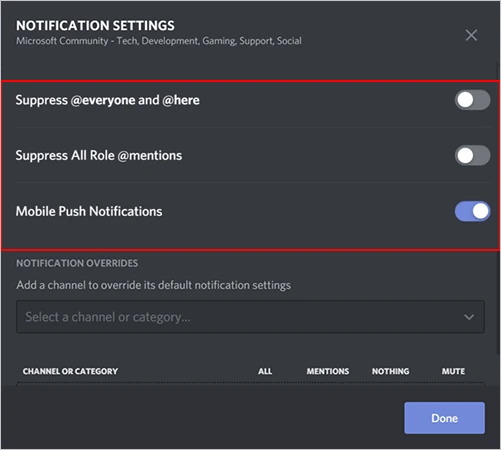
- Step 5: Below these options, you’ll also find these three toggles that allow you to further customize your account’s notification settings;
- Suppress @everyone and @here: You receive the notification when someone uses the tags @everyone and @here.
- Suppress All Role @mentions: If you’re assigned to a specific user role on a server then, whenever @UserRole is typed in one of the chat channels, you receive the notification.
- Mobile Push Notifications: You also get forwarded notification from Discord to the email address associated with your account.
You can simply switch them ‘Off’ or ‘On’ to disable or enable these notifications.
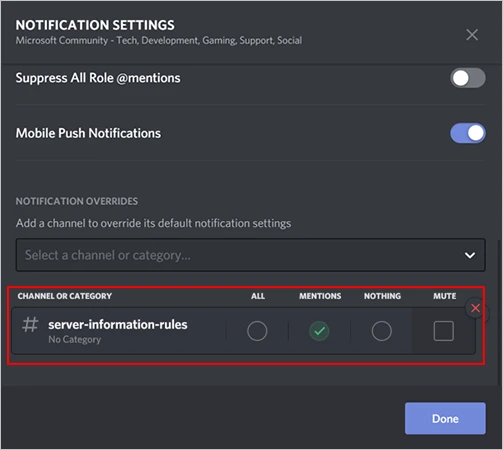
- Step 6: Following that, you can also customize settings for individual channels instead of the entire server. To do so, click the drop-down ‘Menu,’ choose the desired ‘Channel,’ and check the ‘Corresponding Bubble’ for the notification setting you wish to change.
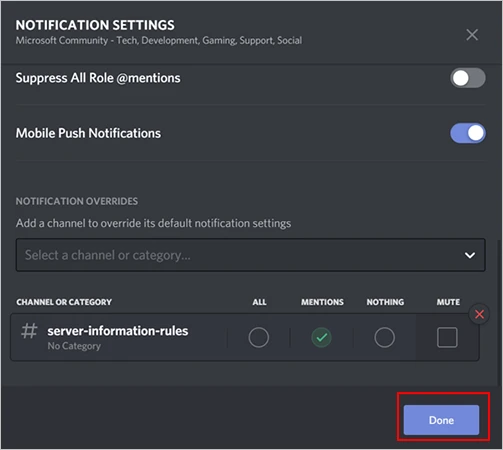
- Step 7: Now, when you’ve finished making your desired changes to the notification settings, click ‘Done’ to save your modifications.
Also, Read: How to Find Somone’s IP Address on Discord?
Bottom Line
That is all. Hopefully this guide has provided you with all the essential knowledge you need to navigate Discord effectively.
With the ability to know how to make a discord account, manage friends, join servers, and customize notifications, you’re all set to embark on a seamless Discord journey.
So, why wait anymore? Go, dive into Discord’s vibrant communities and endless possibilities now!
However, note that occasionally, you may encounter issues like Discord not working, but rest assured that with the right guidance, resolving such issues is a breeze.
FAQs
Ans: To create Discord account, the process is very easy. You need to visit the ‘Website,’ click on ‘Register,’ and follow the ‘On-screen instructions.’
Ans: Back in the year 2015, it was initially launched to provide gamers a platform where they could easily communicate to form tight-knit communities based on their interests.
Ans: Yes, in order to use the platform, you will need to sign up for it and create an account. The Discord sign up process involves entering an ‘email address, a username, your date of birth, a password’ and clicking the ‘Claim Account’ button.
Ans: To create discord account, you need a valid email address, a chosen username, a password, and your date of birth.
Ans: No. The right age to get started with the platform must be at least 13 years old because there is a lot of inappropriate content on the platform ranging from swearing to graphic language and images.
Ans: Yes, you can have as many accounts you want and having two or more accounts at once is possible simply by registering each account using a different email address.
Ans: Yes, a 13-year-old can make a Discord account. But, remember there may be restrictions and parental consent requirements depending on the region and the platform’s policies.
Ans: Though, you can use right monitoring and privacy settings to make sure you’re safe on the platform but, it is advisable to be more careful such as only accept friend requests from those people you know somehow.
Ans: It depends. The premium version of this platform is paid. However, if you don’t want to use the premium features, you can simply download and continue using Discord for free on your respective devices.
Sources:
Useful Tips for Beginners in Clash of Clans
The Best CS2 Cases to Open in 2023

The Emergence of Digital Assets in the Gaming…

Best Places to Play Spider Solitaire Online
How to Share Screen on Discord – A…

League of Legends_ Beyond the Game – The…

10 Best Ways to Invest in Crypto Gaming…

Understanding the Gaming Audience: Who Spends the Most…

Facts About Major League Baseball
Tips on How to Become a Gaming Streamer
How to Play Minecraft for Free
CS:Go Skin Trading – A Beginners Guide